Photoshop is a great tool for photographers and digital artists to warp images quickly and with precision. If you work with loads of images for editing, chances are you already use Photoshop and are looking to learn how to use the warp tool.
In today’s article, you’ll learn how to warp images using Photoshop Warp tools and our flagship plug-in for photo editing, Optics, which features warp tools from Emmy award-winning Boris FX Sapphire filter.
Before we dive into the tutorial part of this article, let’s quickly review what warp is and why you should learn how to warp images in Adobe Photoshop or any other photo editing software.
Let’s dive in!
What is Warp in Photoshop
Warp or warping is a distortion effect that allows you to manipulate part of a photo or the entire image to deform it, creating the effect of it being bent and twisted. Many of its uses are aesthetic: creating visual effects such as morphing and lens distortions like the popular fisheye effect, or simply reshaping elements.
Other uses include fixing perspective issues and lens distortion caused by the camera’s lenses, aligning images with elements in the real world, and making precise adjustments to specific elements, such as facial adjustments to the eyes, the corner of the mouth to form a smile, moving arms and legs, and more.
Warp can be a very versatile tool once you master it and experiment creatively. Warp can help you create unique designs and change the outcome and feeling of your photography projects.
How to Warp an Image in Photoshop: Step-by-Step

I’ll show you two methods you can use to warp images in Adobe Photoshop: the Warp tool and the Puppet Warp tool. Both are easy to learn, but they are tailored for different situations.
Warp Tool
Adobe Photoshop's perspective warp tool works in a grid system with control points you drag to warp images, shapes, and paths. It features many options and warp presets to deform images quickly.
-
Step 1: Create a New Photoshop Document
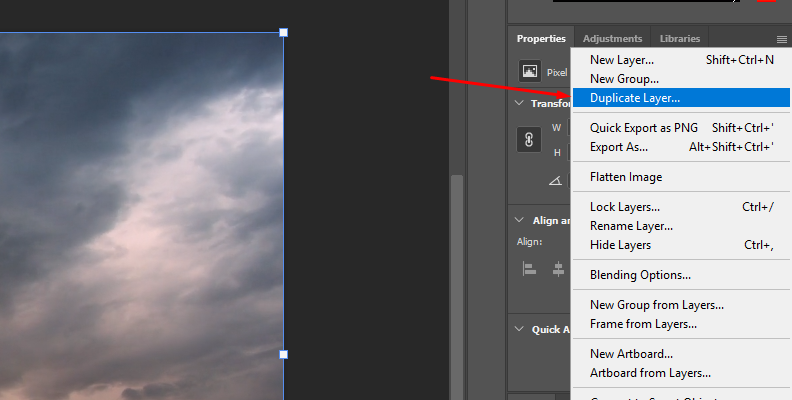
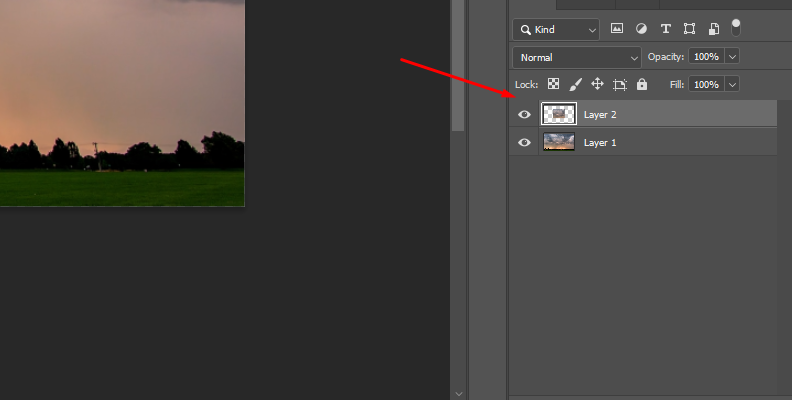
Start a new document with the image you want to warp, select the background layer, and duplicate it with CTRL+J on Windows or CMD+J on Mac.
You can warp the entire image or part of it using the selection tools. If you want to warp the entire layer, you can skip the next step.
-
Step 2: Add a Selection Layer
To warp only a specific element in your photo, you need to use one of the selection tools, such as the lasso or the rectangular marquee tool.
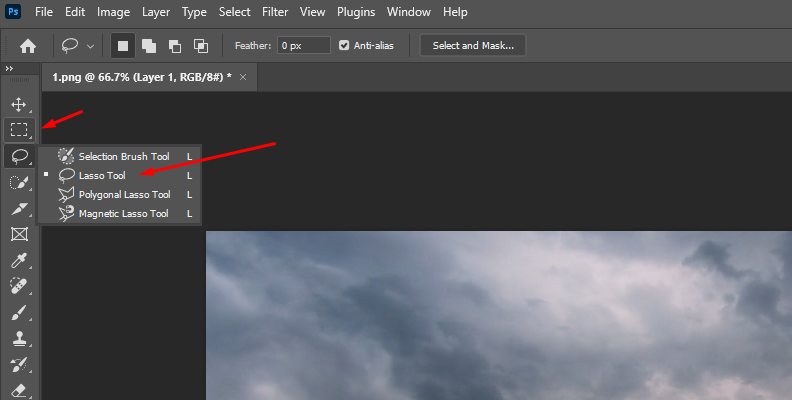
Use the tool to select the element to warp, and with the selection highlighted, press CTRL+J or CMD+J to create a new layer with only the selected content.
-
Step 3: Apply the Warp Tool
Select the layer to warp and go to the Edit menu on the top menu bar, then navigate to Transform > Warp.
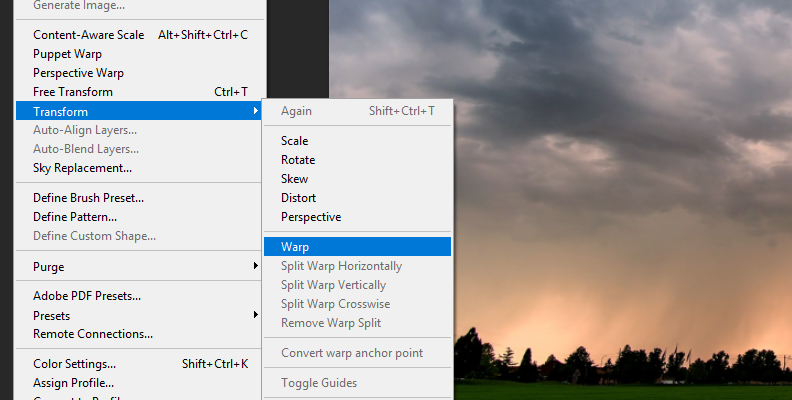
You can also get to the Warp tool by pressing the keyboard shortcut CTRL+T or CMD+J on Windows and Mac, respectively.
-
Step 4: Distort with the Warp Tool
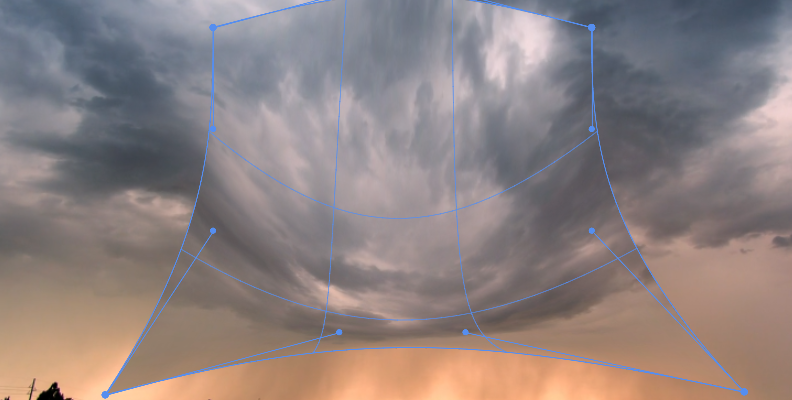
When you add the Warp tool, you’ll see the control points appear around the edges of the picture. If you don’t see any points around the image, click the Gear icon in the Options bar and ensure “Always Show Guides” is selected. You can also change the color of the grid lines, opacity, and density.
With the grid lines visible, click and drag the anchor points to warp the image in the dragged direction. Once you achieve the desired warp distortion, press Enter or click the checkmark icon on the far right of the Options bar.
To undo changes, use CTRL+Z or CMD+Z or press the Reset button in the Options bar to restart the warping.
-
Step 5: Grid Configuration
You can add extra anchor points to have more control of the parts you want to warp and to lock parts of the image from distorting. Add more control points by either using the split buttons to add grid lines or selecting a Grid preset.
Click the Grid dropdown menu in the Options bar to change the default grid (1x1) to a different configuration. You can also create a custom grid and type the number of columns and rows in the Custom Grid Size pop-up window.
To split the grid, go to the Options bar and choose one of the three split buttons.
- Split Horizontally adds a horizontal line with anchor points.
- Split Vertically adds a vertical division with anchor points.
- Split Crosswise adds a vertical and horizontal division with anchor points.
Now, you can drag the anchor points individually to warp in that direction, drag from outside of the grid to rotate the warp, and drag from the inside to move and realign the image. When you move one of the control points, you’ll see Bezier handles appear next to the points, which you can use to adjust the edges of the warp.
You can select multiple points by pressing Shift+Click and dragging all selected points at the same time. This is very helpful when you have many points on the grid.
-
Step 6: Warp Presets
Photoshop’s Warp tool offers you warp presets. These are useful when you don’t require too much control for warping. You can find the presets in the Options bar. Click the Warp dropdown menu and choose a warp style to deform your image.
Puppet Warp Tool
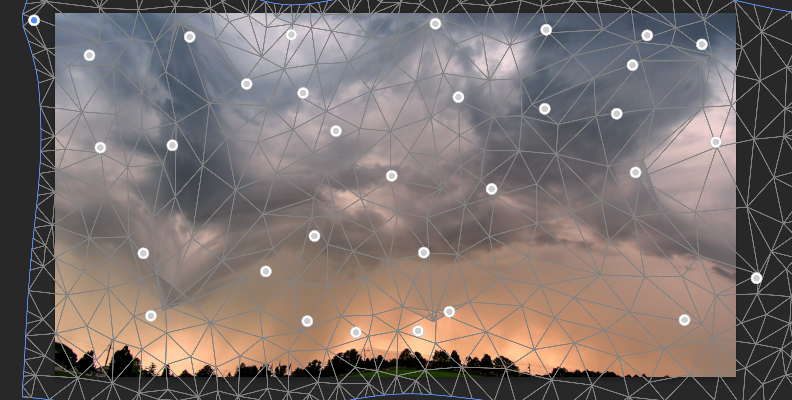
The Puppet Warp tool is another method for warping images in Photoshop with more freedom. It generates a mesh over the entire image, allowing you to work with subtle changes and complex distortions. It can be used with vector masks and Smart Objects.
-
Step 1: Add the Puppet Warp Tool
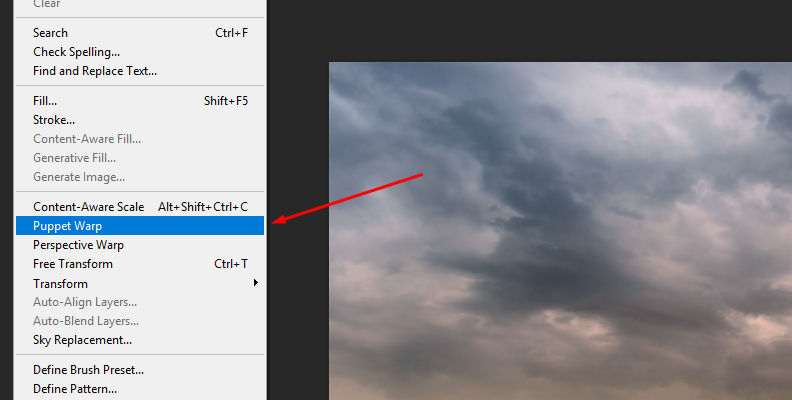
Import the image you want to warp into a new Photoshop document and duplicate the original layer. If you want to warp a small portion of the image, create a selection using one of the selection tools and create a layer from the selection with CTRL+J or CMD+J. Finally, go to Edit > Puppet Warp.
-
Step 2: Puppet Warp Settings
The warp mesh will cover the image or selection, and then you can add anchor points by clicking on the mesh over the areas you want to distort.
Click and drag the control points to warp the image and add more anchor points for parts you don’t want to distort. You can use Shift+Click to select multiple points.
The first setup process can feel daunting, but if you take the time to define the control points properly, you’ll achieve better results.
On the Options bar, you can adjust a few settings: Mode, Density, Expansion, Pin Depth, and the Reset, Cancel, and Apply buttons.
-
Mode defines the elasticity of the mesh and how it looks when deforming the image. You can set it to Rigid, Normal, or Distort. Rigid keeps the mesh more still when morphing, while Distort is more stretchy, allowing you to change perspective.
-
With Density, you can control the spacing of the mesh points. “Fewer Points” work for basic objects with less movement. “More Points” provides a finer mesh with higher precision but requires more processing and computer resources.
-
Adjust the Expansion to add or reduce the space at the edges of the mesh.
-
Pin Depth allows you to warp that part of the image to the background or foreground. Select one or more mesh points and click one of the Pin Depth buttons to warp to the back or to the front
To apply the warp distortion, click the checkmark button on the Options bar.
-
Warp an Image in Photoshop with Boris FX Optics
Optics is a great tool that fits seamlessly into your Photoshop or Lightroom workflows and can be used as a full-featured standalone photo editing software. It features Warp filters to create extraordinary warp distortions.
You can download Optics to try for free for 14 days. During the free trial, you’ll have access to the standalone photo editor and the Optics plug-in for Photoshop and Lightroom. Download and install Optics, and let’s begin!
-
Step 1: Set Up a Photoshop Document
Create a new Photoshop document with the image you want to warp in Optics. Duplicate the layer and convert it into a smart object by right-clicking the new layer and selecting the option "Convert to Smart Object."
This will allow you to apply non-destructive editing.
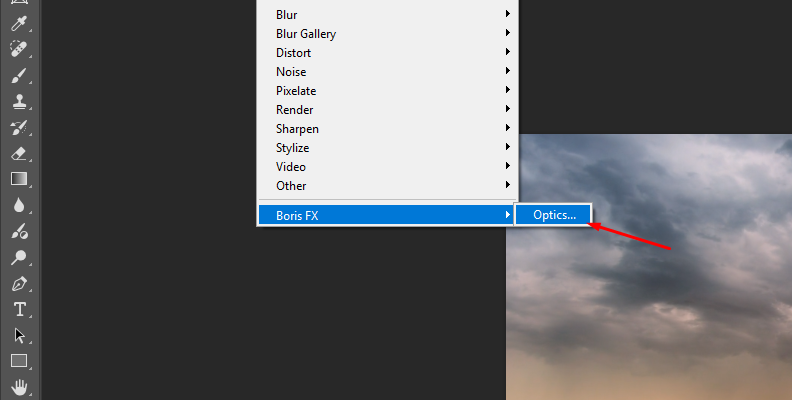
To apply Optics to your image layer, navigate to the menu bar and follow the path Filter > Boris FX > Optics. It will import the layer to continue editing in the Optics UI.
-
Step 2: Add Optics Warp Filters
Optics features several warp filters that you can try depending on your project. Here’s a list with some examples.
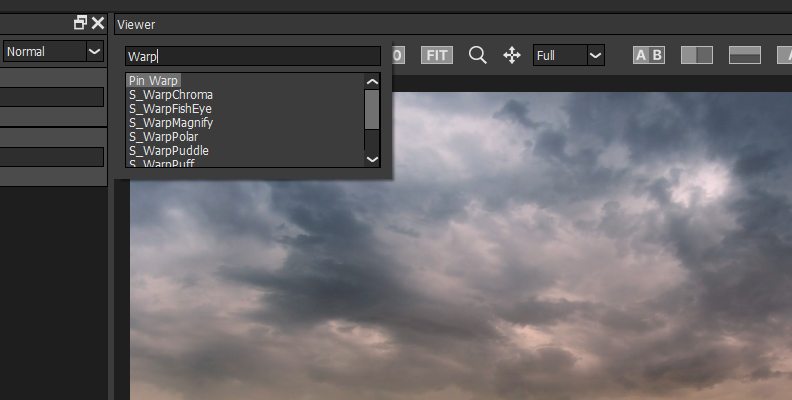
Pin Warp: This filter warps specific areas in the image without affecting the rest. It works by creating pins to pinpoint the areas you want to warp. Useful for subtle distortion, modifying facial features, or repositioning elements.
- S_WarpPolar: Deforms the image into a disk shape, creating a circular pattern. These filters can be used to create kaleidoscope effects.
- S_WarpTransform: Warps the image by adjusting scale, shift, rotation, shear, and perspective.
- S_WarpFishEye: Simulates a fish eye lens.
- S_WarpMagnify: Simulates the effect of looking through a magnifying glass.
- Lens Distortion: Designed to fix lens distortion. It is also useful for simulating wide-angle lenses.
These filters come with presets that cover most of your creative needs. For this tutorial, I’ll show you how to use the Pin Warp filter to create a custom warp, adding up to 20 pins.
Navigate to the Lens/Distort filter category below the preview window, click the Pin Warp filter to apply it to the current layer.
-
Step 3: Warp Filter Settings
Start by setting up the pins in the image. Simply click and drag on the image to add a new pin and warp in that direction.

Each time you click and drag on a different area, you’ll add a new pin. You can add pins without dragging (simply clicking) to lock that area of the image from warping. You can add up to 20 pins in total.
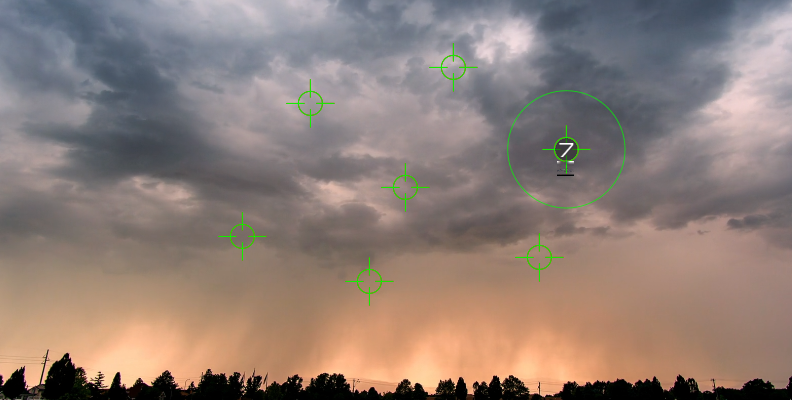
Experiment by combining other warping tools and masks in the Layers panel to restrict the warp distortion to specific areas of the image. Once you have achieved a good-looking warp, click Apply to return to Photoshop and export the final image.

Final Words
Warp is an effect that you can use in countless different ways: all you need to do is take the time to experiment with it and get creative.
With Optics, it’s easier to work with the presets that most filters include, providing ideas if you’re not sure how to begin. Besides the warp filters recommended in this guide, the Sapphire filters S_WarpPuff, S_WarpPuddle, and S_WarpWaves2 included in Optics are capable of creating beautiful, surreal photography.
Download the Boris FX Hub and your free 14-day trial of Optics today!
FAQ
Is Boris FX Optics Free?
Optics is a paid application you can get as a monthly or yearly subscription, or you can buy a perpetual license. It also offers a fully-featured 14-day trial.
What’s the Difference Between Mesh Warp and Lens Warp?
A Mesh Warp is an editing tool that uses overlay grid lines to manipulate the distortion of the image. You adjust the warp by modifying control points to direct the warping. Lens Warp is a tool that simulates a camera lens to fix lens distortions and optical aberrations, as well as create artistic looks.
Can I use Boris FX Optics with Lightroom or After Effects?
Boris FX Optics is available as a plug-in for Photoshop and Lightroom, and as a standalone photo editor. It is not compatible with After Effects. However, Sapphire is available for After Effects, which features the S_Warp filters mentioned in this guide. Another alternative for After Effects is the Boris FX plug-in Continuum. Both Boris FX plug-ins offer free trials.