Every videographer has faced the dreaded flickering effect. The worst part is noticing it while editing your video, with no option to reshoot and avoid those light artifacts that are now ruining your precious sunset shot.
In today’s article, you’ll learn what flickering is and why lights flicker in your camera. Then, I’ll provide a step-by-step guide to removing flicker from your video in DaVinci Resolve using the BCC Flicker Fixer filter from the Continuum plug-in.
Let’s dive in!
What Is Flickering?
Flickering is an effect that occurs when light sources shine intermittently and erratically. It can occur naturally because of movement, like a candle, or due to a problem with an electrical connection. Flickering is a common issue on videos when filming under certain circumstances, and it appears in your videos as distracting and unsteady light artifacts that affect the brightness of each light.
The flicker can affect the entire image or small sections, and it can be uniform throughout the frame or vary from frame to frame. These light artifacts can ruin a good shot with distracting flashes, but occasionally, they can be used as a creative filter to add flashy visual effects.
Bear in mind that flickering lights can be triggers for people with photosensitive epilepsy, so you want to be careful with them, remove or avoid undesired flickering in your videos, and add a warning when you use them intentionally.
There are ways to avoid shooting flickering, such as changing lighting, making camera adjustments, and editing in post-production.
Reasons Your Lights Flicker on Camera
One of the main reasons why lights flicker on camera is the artificial light source and camera configuration.
Artificial light and shutter speed: Our eyes perceive artificial light as continuous. However, it actually turns on and off very quickly. When using a shutter speed that is not in sync with the artificial light frequency, the camera captures this off-point, which results in the flickering effect.
Camera settings: Camera settings such as the ISO, aperture variations, and using the wrong frame rate can make your camera prone to flickering.
Environmental factors include swift variations in lighting caused by moving clouds or the obstruction of natural light by fast-moving objects.
If you're uncertain how to set your shutter speed and other camera settings, take a few test shots before the filming.
Remove Flickering in DaVinci Resolve with BCC Flicker Fixer
In this step-by-step guide, you will use BCC Flicker Fixer, a plug-in filter to eliminate flicker from source video footage. This effect is part of the Continuum plug-in and can be utilized within DaVinci Resolve Studio and the free version.
Step 1: Get Continuum

If you are a current user of Continuum, you already have BCC Flicker Fixer installed! But if this is your first time using Continuum, you must download it first. Go to the Continuum’s website, download the Boris FX Hub, and install it. From the Boris FX Hub, install Continuum for DaVinci Resolve and wait. I recommend you close DaVinci Resolve during the installation.

Step 2: Add BCC Flicker Fixer to the Clip
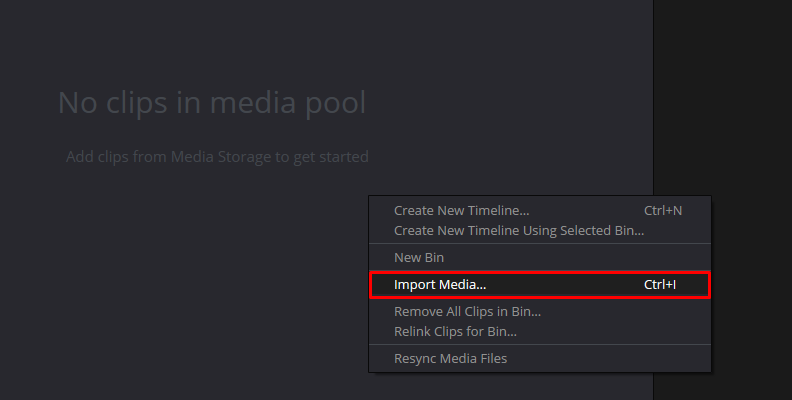
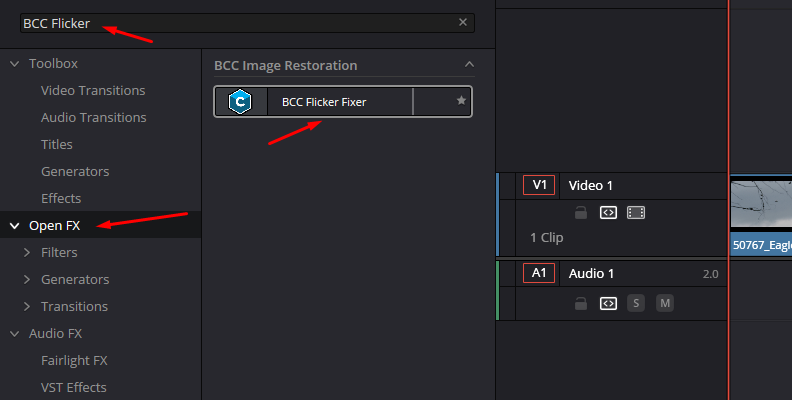
Launch DaVinci Resolve and import the video clip to fix. Open the Effects library by clicking the Effects button at the top left corner. The Continuum effects will be under the Open FX folder. Then, navigate to the BCC Image Restoration category and find BCC Flicker Fixer.

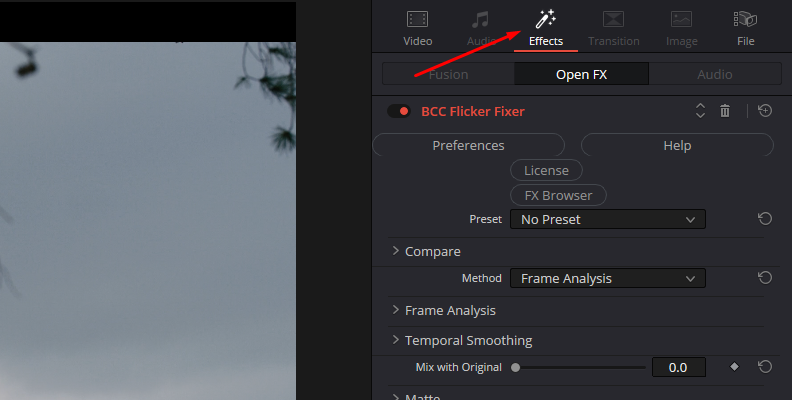
Add the filter by dragging it to the video clip to fix it on the timeline. Then, select the clip and open the Inspector panel to see the BCC Flicker Fixer parameters.
Step 3: Choose the Best Flicker Fix Removal Method
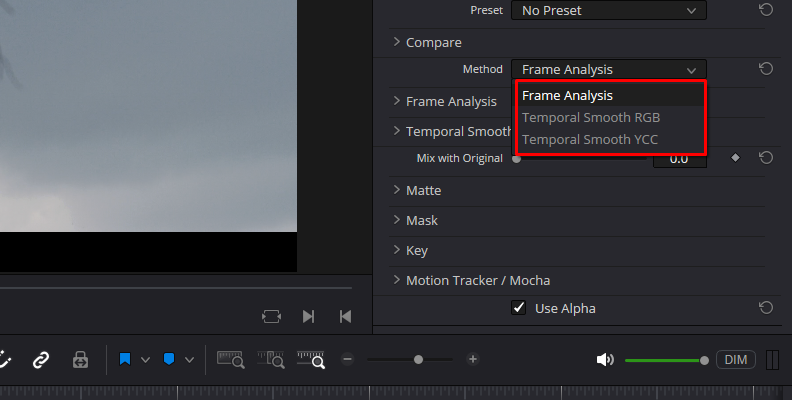
BCC Flicker Fixer provides three methods for removing flickering: Frame Analysis, Temporal Smooth RGB, and Temporal Smooth YCC. Let’s learn when to use each one and what additional settings you can tweak to remove flicker without affecting your video.
Frame Analysis
This method works best when the flicker is uniform throughout the image. It analyzes the color range on each frame of your video and adjusts the pixels based on the difference between the current frame's RGB color range and the average color range of adjacent frames.
When you select Frame Analysis as the method, the Frame Analysis parameters group will be enabled.
In Time Window, you can set the number of frames the filter analyzes, and Time Window Cutoff adjusts how far the analysis extends throughout the video clip. Increasing these two settings will increase the render time, but increasing the Time Window can help with slow flickering. The Faster Analysis speeds up the analysis with little impact on the render quality.
Finally, when you have the flickering on a portion of the image, check the Limit Sampling option. Use the Sampling parameter below to set the region of interest by typing the values, or you can enable the Open FX Overlay to move the controls in the viewer window.
Limit Sampling may partially remove the flickering and add flicker to parts of the images without flickering. You can use the Mask and Key parameters to isolate the parts without flickering and protect them from being affected. You can also limit the effect using the integrated Mocha under the Motion Tracker / Mocha parameter group.
Temporal Smoothing
This method is ideal when the flicker is limited to a portion of the image and varies from pixel to pixel within the frame. It analyses each pixel independently, so it works better with static objects and adds softening to the non-flickering areas. However, you can minimize the smoothing using a matte.
When you choose RGB or YCC, the Temporal Smoothing parameter group will activate. The only differences are the individual color range sliders. It is advisable to start with RGB, as it operates faster, and the outcomes are similar.
Adjust the Smoothing setting to determine the level of smoothing applied. Use the Color Range slider to scale the range of the three color channels. Set the individual color range using the RGB or YCbCr slider, which will be enabled based on the selected Smoothing method.
Adjust Max Frames to determine the maximum number of frames the filter will analyze. When you have rapid flickering, use the Smooth by Fields option to soften each surrounding field instead of each frame.
Final Words
While with BCC Flicker Fixer, you can control the flickering, it's always better to prevent the issue from happening. Avoid shooting flickers by getting familiar with your camera settings and testing the environment where you are shooting. If using artificial lighting, relocate it or try different angles that won't negatively impact your video footage.
Have fun, and if you can't avoid flickering, get BCC Flicker Fixer with Continuum and forget about flickering issues in your videos.
Good luck!