Masking in Photoshop is a skill that every photo editor, graphic designer, and VFX artist should learn. Masking forms the basis of non-destructive editing, enabling you to create exciting image composites.
In today’s article, I’ll show you several masking techniques to use in Photoshop and how to work with them. Additionally, we’ll explore two Optics masking techniques that will speed up your masking process.
Let’s dive in!
What is a Layer Mask and What Does it Do?
Masking is a photo editing and graphic design technique that unlocks plenty of possibilities for non-destructive image editing in Photoshop. Layer masks serve as stencils that hide or reveal different regions of another layer. This technique enables creativity in compositing, applying effects, and correcting photos.
A layer mask can be very useful for many types of editing. A few examples of edits using masking techniques are:
Seamlessly blending images to create smooth collages.
Selective adjustments such as color corrections and brightness.
Object removal and isolation.
Restrict effects and filters to a part of the image.
Text reveals.
Masking Techniques in Photoshop
Before we jump into the step-by-step guide, let’s discuss the different masking techniques available in Photoshop.
Layer Mask
Layer masks are the most basic and versatile masking technique. They’re the foundation of the masking techniques. Layer masks are non-destructive, meaning you won’t alter the original image's pixels.
Layer masks involve adding a layer mask to the original image layer using grayscale values. The white areas reveal the content from the original layer, the black areas hide content, and the gray regions partially reveal the content below. They are most effective for general masking, blending, and non-destructive adjustments.
Clipping Mask
Clipping masks are like layers within layers. They use the content from another layer to define the visibility of the layer above. They cut the shape from the layer below to reveal the layer above, which is restricted to the pixels in the clipping mask. Clipping masks are best suited for textures, text, and effects where you want the image to take the shape of the clipping mask. A very common example is a text filled with the original layer.
Vector Mask
Vector masks are known for their precise shapes. They are created using vector paths with the pen and shape tools, instead of pixels from another layer. They offer precision and are scalable masks. Vector masks are mostly used to mask objects with precise shapes and sharp edges, such as graphics, logos, or text, and elements that need to be resized without losing quality.
Selection Mask
In Photoshop, a selection mask is a technique for creating a mask based on an existing selection. You must select the object you want to isolate using Photoshop selection tools, such as the lasso, quick selection, or magic wand tools. The selected area will be revealed, and the unselected regions will be hidden.
Mask All Objects
Mask All Objects is a feature in Photoshop that enables you to create layer masks for multiple objects within the original layer. Photoshop automatically detects and generates masks for all objects in the image, but the process may take longer when the image contains multiple objects. This feature is useful for isolating several people in a photo.
How to Mask in Photoshop
Step 1: Set Up a New Document
Open Photoshop and make a New Document, setting the dimensions for your project. Then, press create and import your images.
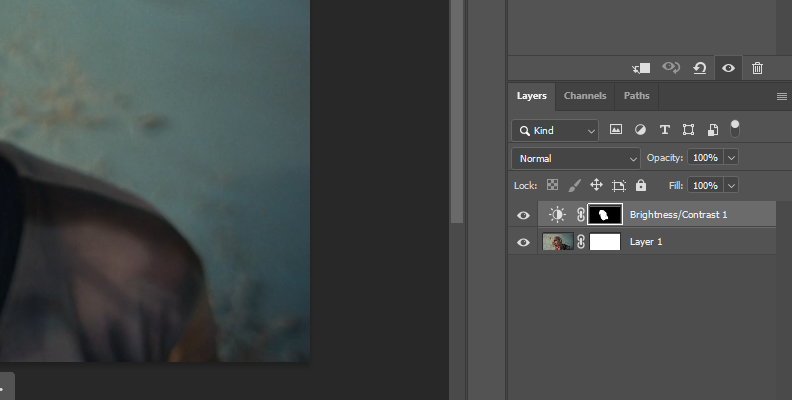
Step 2: Create a Layer Mask
Select a layer from the layer panel and click the Add Layer Mask icon at the bottom. The mask thumbnail appears next to the layer’s thumbnail.
Right now, the layer is fully white, revealing the original layer. To edit the mask, select the layer mask and use a paint brush to paint over the parts you want to hide and reveal. Use white to reveal regions and black to hide parts of the image.
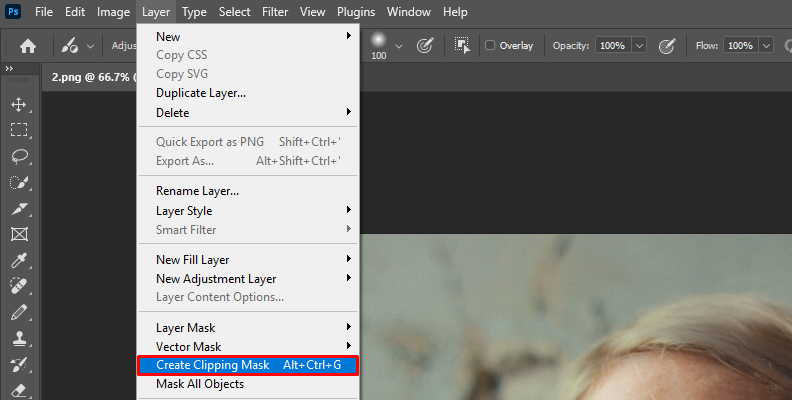
Step 3: Create a Clipping Mask
Arrange the layers in the layer panel, placing the layer that will be the mask below the one you want to clip. Select the layer you want to clip and go to Layer > Create Clipping Mask.
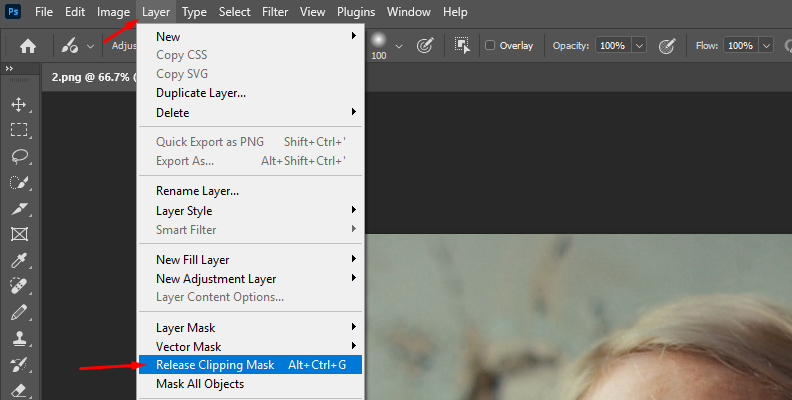
You can remove a clipped layer by going to Layer and selecting “Release Clipping Masks.”
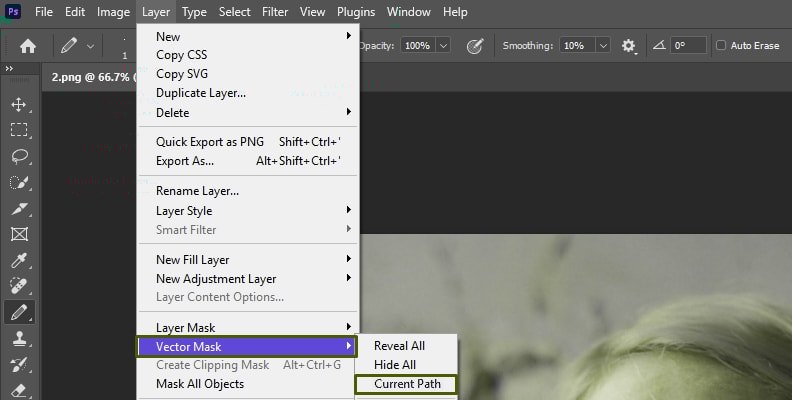
Step 4: Create a Vector Mask
Select the layer where you want to add a mask. Use the pen tool to draw a path around the area to reveal. You can also use one of the shape tools for specific-shaped objects. Once you have the path created, go to Layer > Vector Mask > Current Path to use the current path to generate a layer mask.
You can add a shape layer instead, which will automatically add a vector mask. Then, position the shape where you want it.
Step 5: Create a Selection-Based Mask
Select the layer you wish to mask and use one of the selection tools available in Photoshop. Make your selection in the image, then click the Add Layer Mask button at the bottom of the layers panel to create the mask. Your selection will be visible, while the unselected parts will be hidden from the layer.
Step 6: Create a Mask with Mask All Objects
Select the layer with the image and go to Layer > Mask All Objects. Or, right-click the layer and select Mask All Objects from the dropdown menu. Remember that it may take a long time to process multiple objects.
Once the layer masks are generated, you can add an adjustment layer to each mask to apply different filters to the isolated objects.
Step 7: Edit the Mask
You can edit and refine a vector and layer mask from the properties panel. Click the layer mask thumbnail and go to the properties panel. There, you can adjust the mask's opacity with the Density and soften the edges of the mask with the Feather slider to create a smoother transition and blending between the masked and unmasked sections of the image.
You have other options to invert the mask and refine its borders. Experiment to create a natural layer mask.
Step 8: Copy and Duplicate a Layer Mask
If you need to copy or duplicate a layer mask to a different layer, click and drag the layer mask to the desired layer. Then, you can edit the layer mask from the properties panel.
How to Mask with Optics' Mask ML and EZ Mask
In the following section, you’ll learn to mask with the Optics’ Mask ML and EZ Mask masking tools. Optics is a plug-in for Photoshop and Lightroom, and a standalone application for professional photo editing and visual effects. It features Hollywood-grade effects, vintage and modern film stocks, dynamic particles, and AI-powered masking.
To begin this tutorial, download and install Optics or get a free trial.
Step 1: Create a New Photoshop Document
Create a new Photoshop document and import the photo where you want to make a layer mask with Optics.
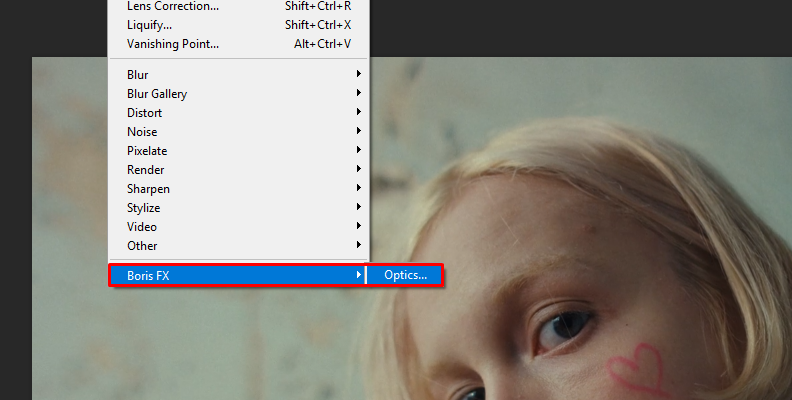
Step 2: Apply Optics as a Filter
To launch Optics in Photoshop, you must apply it as a filter and convert the layer to a smart object so you can make changes later if needed. Right-click the layer from the layers panel and select “Convert to Smart Object.”
Then, go to Filter > Boris FX > Optics to add it to the selected layer.
The selected layer will be imported into Optics, where you can start working with the plug-in. If a prompt appears the first time you launch Optics, click No, as we haven’t done anything yet.
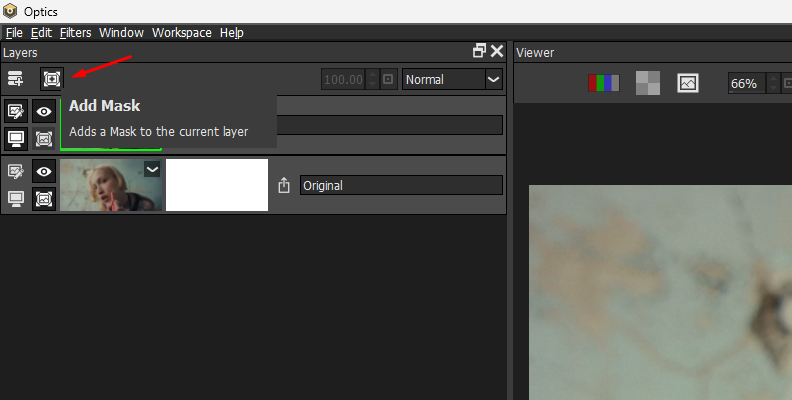
Step 3: Create a Mask
Select your current layer to create a mask, and click the Add Mask icon above the layers panel.
Optics offers several masking tools for your images. I'll show you how to use two masking tools, making your masking process much easier.
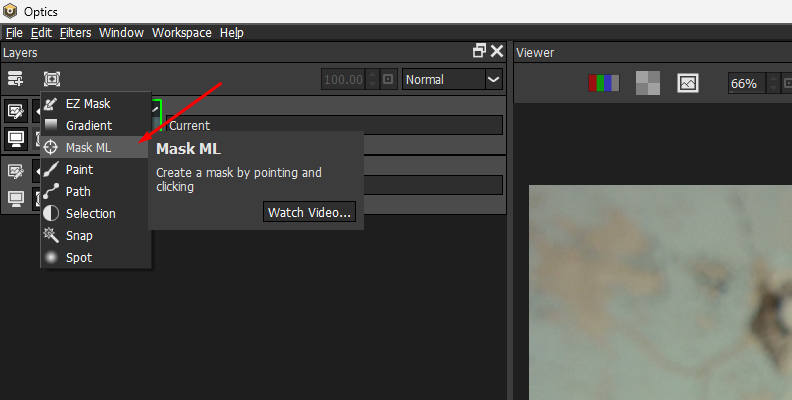
Working with Mask ML
Select Mask ML from the dropdown menu on the Add Mask icon. Mask ML is a point-and-click mask generator that uses machine learning to analyze images and automatically identify objects and subjects to isolate.
Hover over the object you want to isolate with the mask and press the left click on your mouse to set a point. The mask will automatically be created around the subject. You can add additional points by using the left click to add more areas to the mask layer.
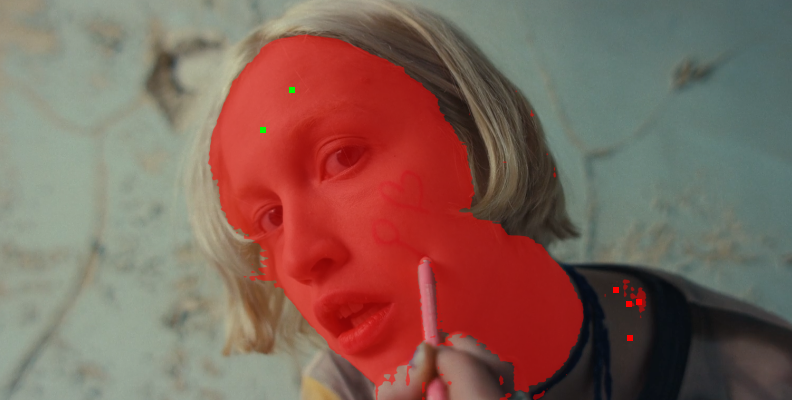
If you accidentally add parts of the image you want to exclude from the mask later, right-click to delete them.
Press ALT while hovering over the subject to preview the mask's overlay. Once you have the mask exactly as you want, press the Engine icon or the Enter key to process it.
Now, you can add the filter you prefer and restrict it to the masked region. If you revert the mask, you can apply it to the entire layer except the masked object.
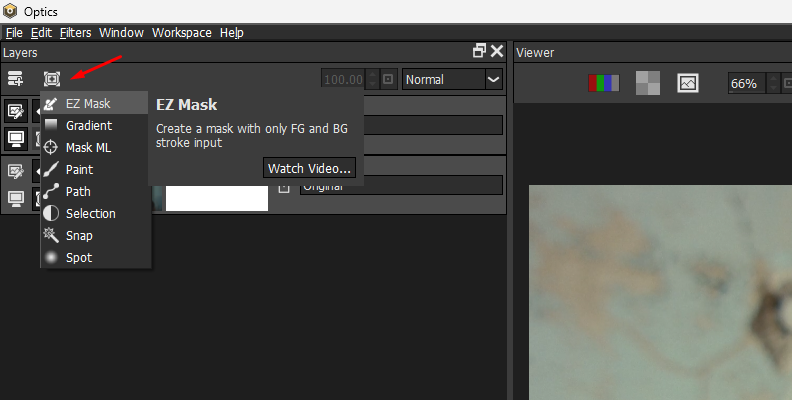
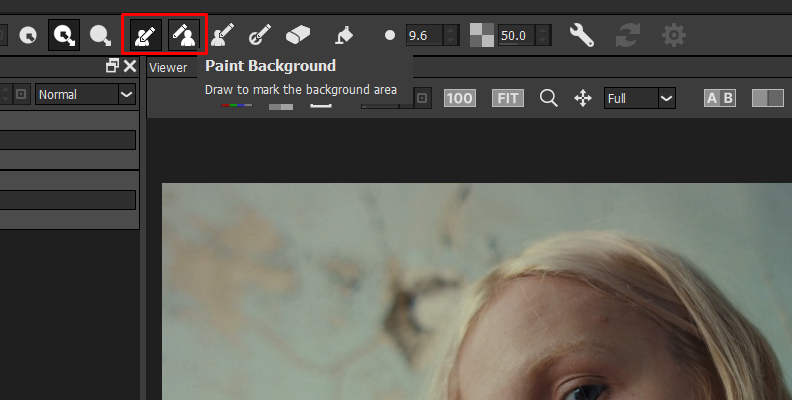
Working with EZ Mask
The EZ Mask feature is another quick way to create a mask layer with Optics. It estimates the transparency value from an image’s pixels through samples of the background and foreground pixels input by the user. EZ Mask can effortlessly generate masks separating the foreground from the background and using semi-transparent regions.
Select a layer from the panel, click the Add Mask button, and select EZ Mask from the dropdown menu.
The mask toolbar contains several tools for generating the mask. The two main brushes are the Paint Foreground brush and the Paint Background brush.
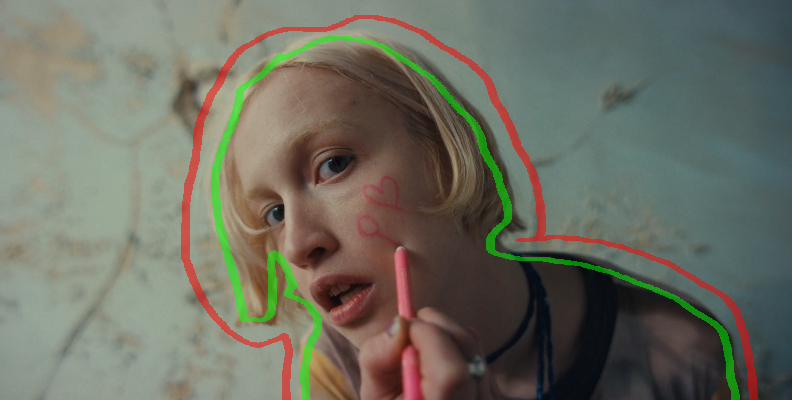
By default, the Paint Foreground brush is selected, and you can add strokes over the foreground object by left-clicking and dragging the brush. Draw an inner outline around the foreground object you want to isolate with the mask. Try to make the strokes close to the edge but not over it.
Next, select the Paint Background brush, or use the right click and drag the brush to paint over the background area of the image. You should have the foreground with green strokes and the background with red strokes.
Click the Generate Mask icon (the engine button) or press Enter to generate the mask.
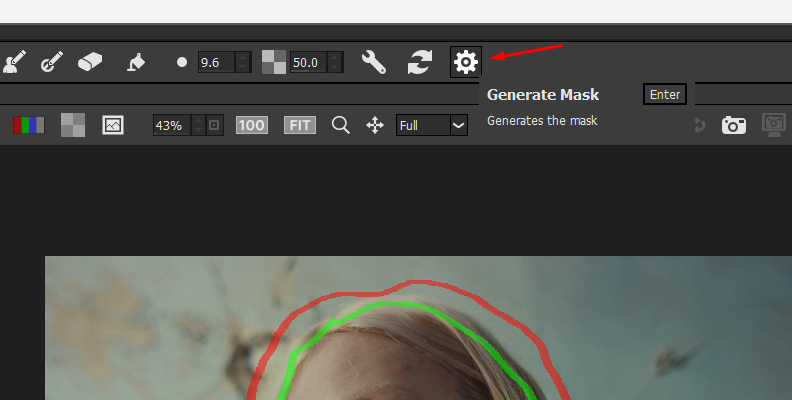
The layer mask thumbnail will appear next to the layer in the layers panel. You can continue editing the photo and apply filters restricted to the mask layer.
Step 4: Copying and Moving Masks
In Optics, you can copy a layer mask to a different layer or filter by clicking and dragging the thumbnail to the layer you want to apply it to. You can also add multiple layer masks to the same layer and click and drag them to change the order within a layer.
Step 5: Render
Once you finish working with your layer masks and filters, click the Apply button at the bottom right of the Optics interface to return to Photoshop. The next time you apply Optics in Photoshop or want to edit the current layer, you can select “Yes” when asked to import previous filters and masks.
Final Words
By following these steps, you can now use different masking tools in Photoshop to enhance your photos and expand your photo editing toolkit. Play with the various settings and use the refining tools to blend your masks smoothly.
If you want to learn and explore more about Boris FX Optics, start a free trial today to use the plug-in in Photoshop or the standalone application.
FAQ
Clipping Mask vs. Layer Mask: Main Difference
The main difference between a clipping and a layer mask is how they control a layer's visibility.
A Layer Mask controls the transparency of a layer with a grayscale image. It uses whites to reveal content, blacks to hide it, and grey levels to partially reveal the layer content. It's applied to a single layer.
A Clipping Mask controls the transparency based on the shape of another layer below. It requires two layers: the bottom layer is the clipping mask or stencil, and the top layer is the clipped mask, cut into the shape of the layer below.
How to Refine Edges in Photoshop
- Select the layer mask and go to the properties panel.
- Click “Select and Mask”.
- In the Select and Mask workspace, you can adjust the settings on the properties panel to the right or use the tools in the toolbar on the left side.
- Use the Refine Edge brush tool to work with hair and fur.
- With the regular brush tool, you can add or subtract areas from the mask. Remember to use white to add and black to subtract.