Image masking is a post-production technique that isolates objects within an image for selective editing, removal, color correction, and special effects. As we're looking for tools to help us minimize the effort required to achieve equal or better results, AI masking has gained popularity and opened more possibilities for video editors and photographers.
In this article, we'll explore AI masking tools and their advantages, give tips for perfecting the masking process, and provide a guide to using the advanced Object Brush and PowerMesh features in Mocha Pro for effective masking and tracking.
Is AI masking the future in post-production? Let's find out!
What is a Mask AI Tool?
Mask AI tools are smart image masking tools that use artificial intelligence to automatically identify objects and isolate them from the rest of the image in photos or videos. It helps you easily create masks to remove backgrounds, add special effects, and enhance and retouch photos with filters.
Mask AI tools function like a standard mask, but their distinction lies in the generation process. AI masking tools use machine learning technology to isolate the chosen element by recognizing patterns and textures in the image to outline a person, body, or sky. AI masking tools can mask complex shapes with intricate details, enabling more accurate segmentation.
Traditional masking techniques are time-consuming to create and usually require manual adjustments. A mask AI tool allows you to quickly generate the mask and use it for video and photo editing. It lets you spend more time compositing and adding visual effects and less time drawing a mask.
Today, AI models and mask AI tools have been refined to produce more precise results. Many photo and video editing software, plug-ins, and web-based services offer AI masking features.
Importance of Accurate Image Masking with AI
Traditional image masking tools can take time to generate accurate masks for realistic compositions. Mask AI tools are not only about speeding up the masking process but also about creating accurate masks that are ready to use with fewer adjustments.
The accuracy of the mask can improve your editing workflow, which translates into less time correcting, blending, and hiding imperfections.
Pros of AI Masking Compared to Manual Masking, Alpha Channels, etc
Let's review the advantages of using AI masking compared to other image masking approaches.
-
Easy to use: AI masking is user-friendly. Usually, you just need to select the AI masking tool and click on the subject. There's no need to draw shapes manually with pen or brush tools. Some AI masking tools even allow you to use text prompts to define what you want to mask. This feature makes it easy for users of all levels.
-
Time-Saving: AI masking streamlines the time and effort involved in the masking process, improving speed and efficiency. Since AI models are trained to recognize outlines and textures, they can swiftly define the boundaries of the subject you wish to isolate.
-
Automation: AI masking automates the masking process by reducing manual selection and improving your workflow so you can concentrate on other aspects of your project.
-
Accuracy: AI has advanced and can now deliver accurate masks, particularly for well-defined subjects. While it may need a few adjustments, you're already one step ahead.
Advanced Masking with Mocha Pro’s Object Brush and PowerMesh Tracking
PowerMesh is a Mocha Pro feature that adds sub-planar tracking to the popular planar tracker. This allows users to track complex warped and non-planar surfaces that can be hard to track with the planar tracker. Object Brush allows you to select the subject of your mask in one click.
PowerMesh and Object Brush are only available in Mocha Pro, not in Mocha AE. However, you can download a free trial to explore all the advanced Mocha Pro features. You can use Mocha Pro inside Adobe Premiere Pro, After Effects, Vegas Pro, DaVinci Resolve, Nuke, Avid Media Composer, and more.
-
Step 1: Set Up Your Project
Launch the video editing software and start a new project with the video or photo you want to mask and track. Create a new timeline with your media files. Ensure you have installed Mocha Pro for your host, selecting the Adobe, Avid, or OFX installation corresponding to your host.
For this specific example, we'll be using Adobe Premiere Pro.
-
Step 2: Add Mocha and Launch it
Mocha Pro will be listed within your effects library under the Boris FX Mocha > Mocha Pro. Click and drag Mocha Pro to the video clip, go to your effect controls, and click Launch Mocha UI in the Mocha Pro parameters.
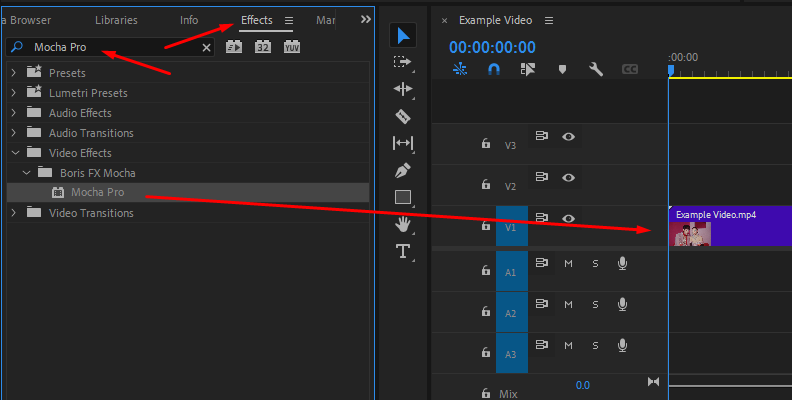
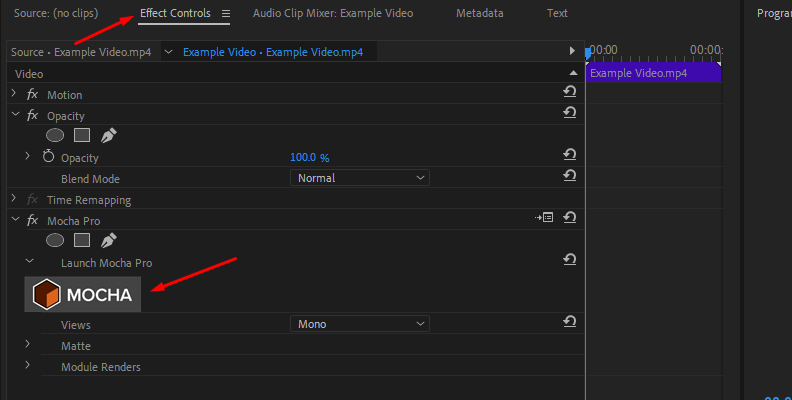
Mocha Pro will automatically import the video footage from your timeline.
-
Step 3: Create the Mask
Scrub through the video clip to find a good frame to use as a reference frame to draw the mask. Depending on what you want to isolate with the mask, ensure it's fully visible in your reference frame. If there are occlusions, create garbage mattes to help with tracking.
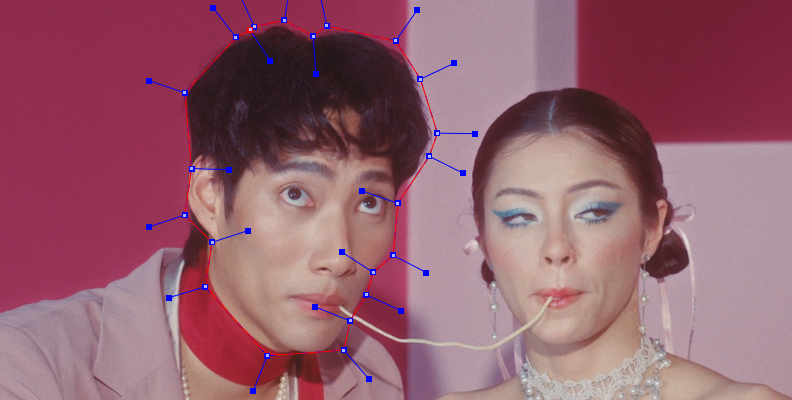
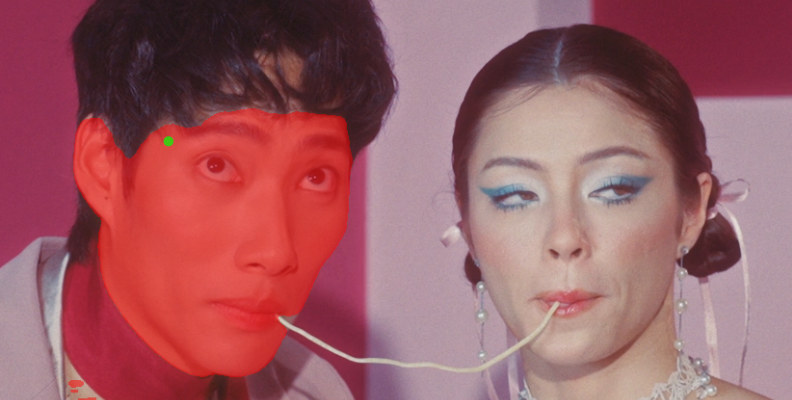
Mocha Pro offers multiple tools to create a mask. You can use the bezier, spline, shape, and brush tools or the brand-new Mask ML Object Brush tool. The Object Brush tool is very helpful for creating garbage mattes with a few clicks. You can also use it as a starting point for your main subject and adjust the shape if needed once it is turned into a spline.
PowerMesh can be more sensitive to shadows and motion blur than the planar tracker. To make PowerMesh tracking more accurate, create bigger garbage masks to cover these occlusions.
-
Step 4: Generate the Mesh
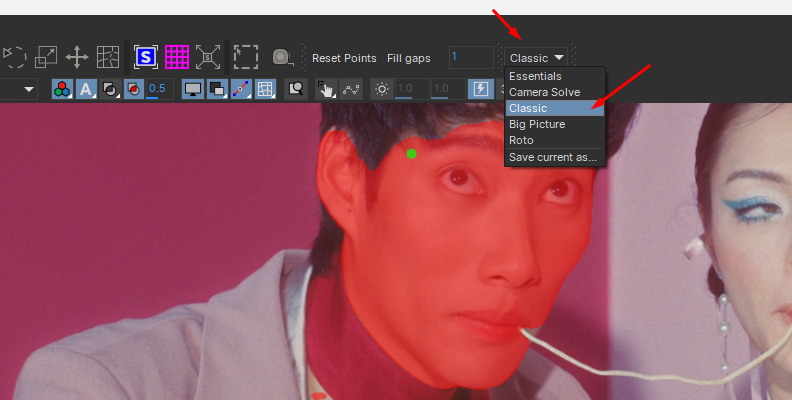
Once your masks are ready, ensure you are in the Classic Workspace to have all the tracking and Mesh options.
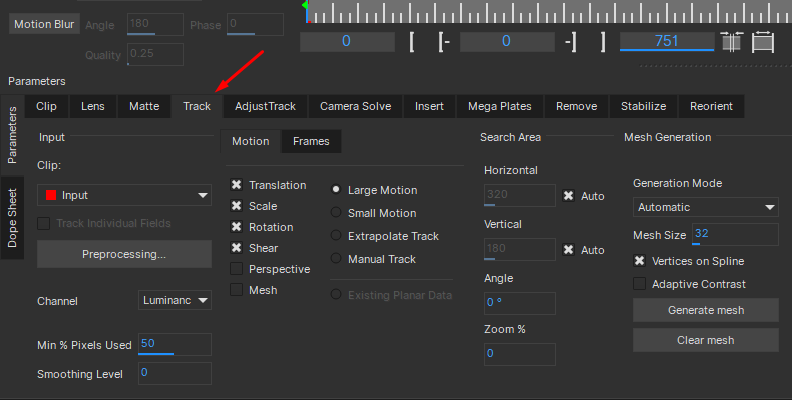
Select the Track module and choose the planar tracking parameter needed for your shot. Then select Mesh to enable PowerMesh tracking. Under the Mesh Generation options, you can refine the generated mesh.
The Automatic Generation Mode is set by default to determine the optimal mesh for your video. You can also choose Adaptive Contrast to create a more appropriate mesh for your surface.
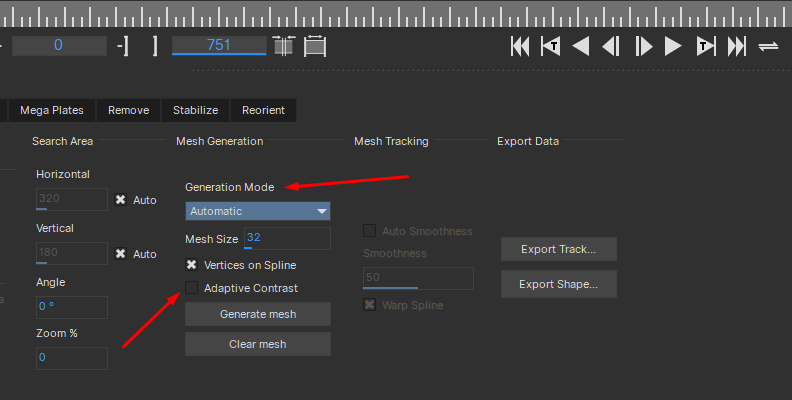
The Uniform Generation Mode produces a uniform square mesh, which is useful when your image lacks sufficient detail or contrast or when there is a lot of movement.
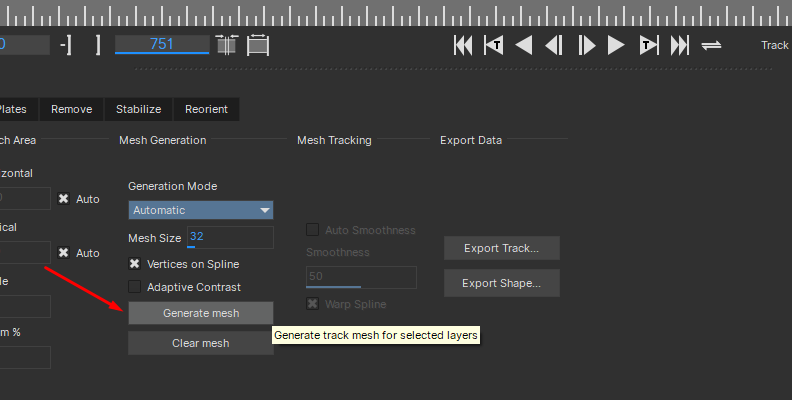
Adjust the mesh size, then click the Generate Mesh button to create the mesh.
-
Step 5: PowerMesh Tracking
Adjust the smoothness under the Mesh Tracking parameters to set how the planar tracker handles organic surfaces.
Use higher smoothness when you track more rigid surfaces to use the planar tracker and add less distortion. Use lower smoothness to follow the sub-planar tracker with more warp and bend objects to add more distortion to the mesh.
If you're tracking a wobbly surface, select the Warp Spline option to deform the spline and match the movement. After the tracking, you can make any other small adjustments using the Mesh Tools in the toolbar, but sometimes, generating a new mesh is faster.
Now, click track forward or backward to track the mesh.
-
Step 6: Export PowerMesh Data
When using the plug-in version of Mocha Pro, you can save and close the Mocha UI and render it in your host software. If you prefer to export the tracking, shape, and 3D data, select File > Export Data and choose your export settings and host.
Tips for Perfect Image AI Masking
Even with AI masking tools, there are a few things to consider when creating a perfect AI image masking.
-
Hair Masking
Hair is one of the most complex masking tasks because of its fine details. When isolating a subject with light-colored or complex-volume hair in a green screen, the hair threads may appear transparent, confuse the keyer, or leave a green spill on the edges. Generating a well-defined mask becomes your priority.
-
Record in the Highest Quality
Working with a mask requires the AI masking software to analyze many details in the photo. The more detailed and better the resolution, the better the Mask AI can identify what’s in the image and isolate the objects you want. Set your camera to the highest quality possible for video and photos.
-
Lighting and Contrast
Well-lit images with good contrast between the elements will be easier for any mask AI to isolate. Shots with many reflections and light shifts may be problematic for some mask AI tools.
-
Use Garbage Matte
AI Masking is not always perfect. Occasionally, you still need to make manual adjustments before and after the tracking. For complex shots with occlusions, it is best to create garbage mattes. Usually, these occlusions can be quickly masked with a Mask AI, and then you can focus on adjusting the mask on your main subject.
-
Know your Tools
Get to know your AI masking tools and their limitations. With practice, you’ll learn when to use them and when to combine them with other traditional masking tools.
Final Words
Image AI masking tools will continue to improve over time. Like most tools, you must become familiar enough to determine when and how to include them in your workflow. Many AI masking tools are user-friendly today, but some may be difficult to get right.
Remember that the AI tool works only as well as the image source you provide. Higher-quality videos are easier to use because they offer more detail for the AI tool to analyze. Keep good lighting and avoid heavy changes in colors.
The Mocha Pro Object Brush, planar tracker, and PowerMesh offer advanced masking options using AI and traditional masks to suit any task. You can experiment with AI masking and advanced PowerMesh tracking today by downloading the free trial.
Good luck!