In a world where everyone aims for the best shot with sharp, high-quality images, it’s nice to look back at the old days when a simple, low-quality VHS tape was all we needed to have fun. Editing images with a VHS retro style can evoke nostalgia in your photos and create a captivating story.
Today, you’ll learn how to create a VHS effect for your images in Adobe Photoshop. I’ll show you how to do it using only Photoshop's built-in tools, and then I’ll teach another method using the Boris FX Optics plug-in inside Photoshop.
Let’s dive in!
What is the VHS Effect?
The VHS effect is a visual style that mimics the qualities of analog videotapes from the 1980s and 1990s, specifically the VHS format. This effect can add a nostalgic and vintage look to your digital images, and it typically involves a combination of color correction, noise reduction, and distortion effects to create an analog appearance.
How to Create the VHS Effect in Photoshop

-
Step 1: Create a New Photoshop Document
Create a new document with the settings of your liking. Import the image you want to turn into a VHS frame and turn that layer into a smart object.
-
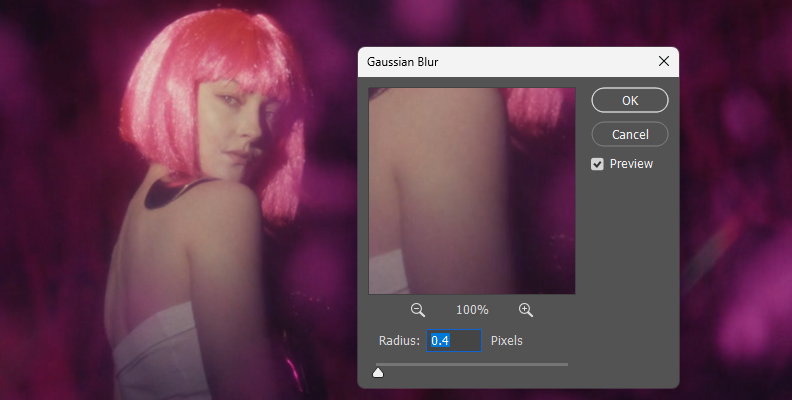
Step 2: Add Blur
Let's start by adding a blur filter to the layer to reduce its quality. VHS frames are known for their low quality, and if your photo was taken with a high-quality digital camera, you'll need to make it softer and less smooth.
Go to Filter > Blur > Gaussian Blur.
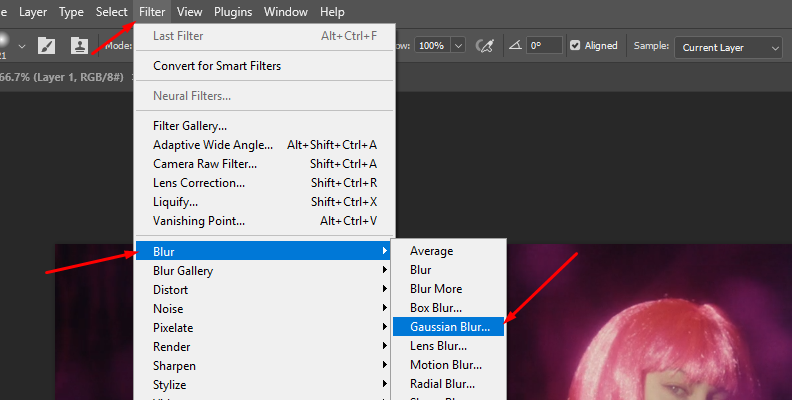
Adjust the Radius to set the amount of blur for your image. You don't need to add too much; just enough to avoid a sharp image.
-
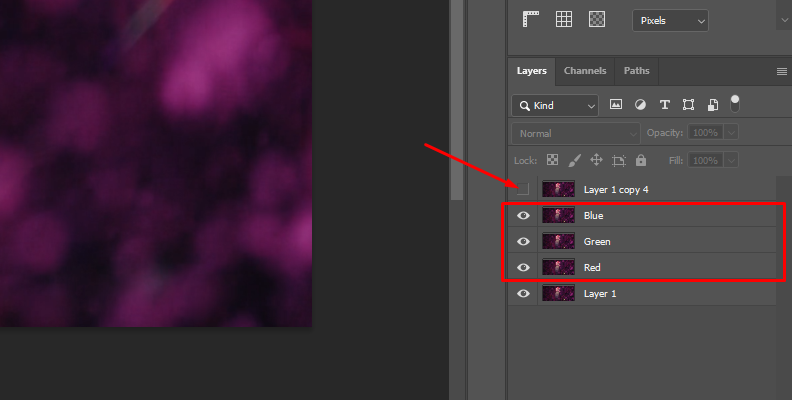
Step 3: Duplicate Layers
Duplicate the layer four times. To identify each layer, let's call the first one (the one at the bottom) 'Original', then the next three layers 'Red', 'Green', and 'Blue'. The top layer will be reserved for the final effects.
Make the last layer invisible so you can work with the Red, Green, and Blue layers.
-
Step 4: Isolate Color Channels
Double-click the Red layer to open the Layer Style window, then go to Advanced Blending options and uncheck the G and B boxes, leaving only the blue channel enabled. Press OK to close the window.
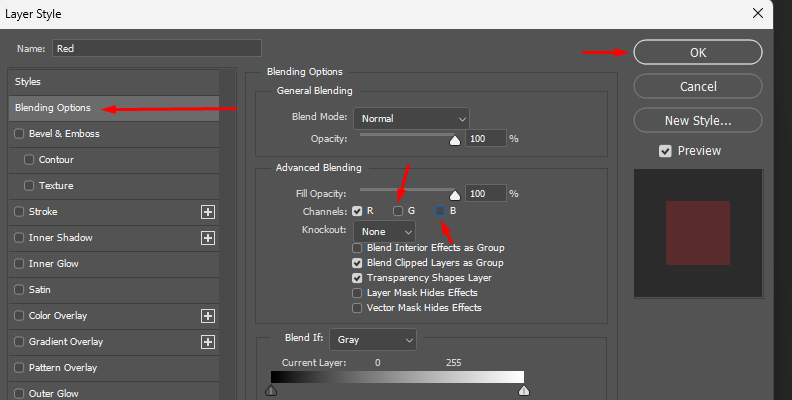
Repeat the process with the Green layer, unchecking the R and B boxes, and then again with the Blue layer, unchecking the R and G boxes.
-
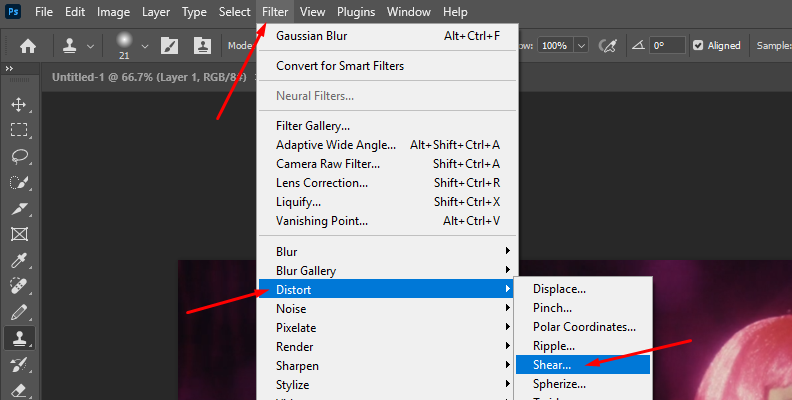
Step 5: Distort Color Channels
Select the Blue layer and go to Filter > Distort > Shear.
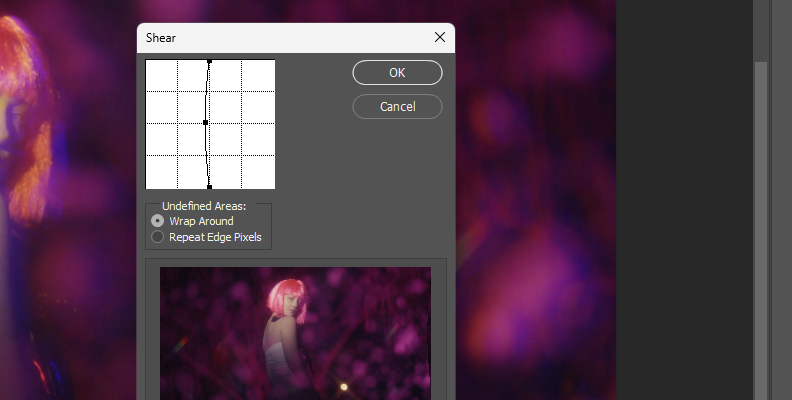
With Shear, we will create a slight distortion using the points in the graph. Add just a bit, as you will be repeating this process with the next layer, so you don't want to overdo the effect. Click OK when you're done.
Now, repeat the process with the Green layer, but use different adjustments for the Shear distortion filter to make it more glitchy. Now you should see the edge of the image with a color distortion.
-
Step 6: Creating the Damaged VHS Effect
Make the last layer visible to create the classic distortion glitch look of a VHS tape. Go to Filter > Distort > Shear. This time, create a more extreme distortion for your image and experiment with the two Undefined Areas option to see which one looks better. Click OK to apply the distortion.
-
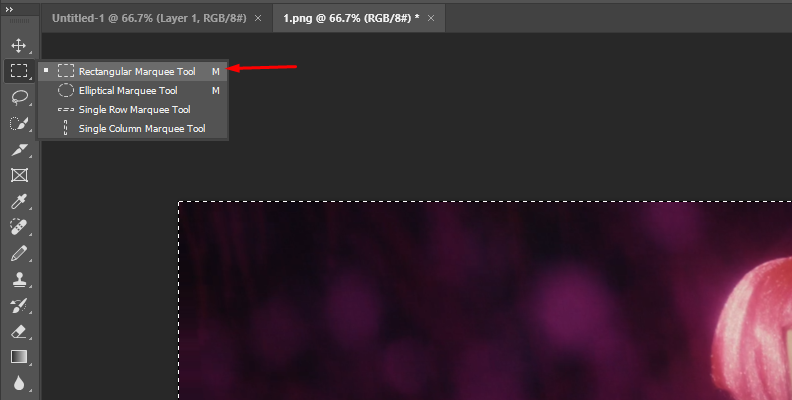
Step 7: Add a Mask Layer
Create a layer mask for the distortion layer and select the Rectangular Marquee Tool to draw a rectangular selection across the entire image.
Hold Ctrl on Windows or Option on Mac, and click the layer mask to view the mask and create additional selections. These selections will represent the distorted blocks that appear when rewinding or pausing a VHS tape. Press CTRL or Command + Delete to fill the selections with black.
Hold CTRL or Option and click the layer mask again to return to the layer image and adjust the Shear filter to make it more or less glitchy.
-
Step 8: Add Noise
Create a new layer and fill it with black. Go to Filter > Noise > Add Noise.
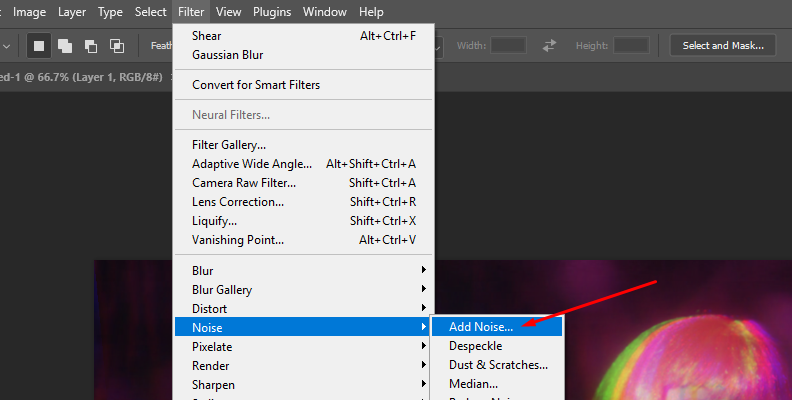
In the Add Noise window, uncheck 'monochromatic' if it is selected to create color noise, adjust the noise to the maximum amount, and click OK. Then, change the blending mode and lower the opacity of the noise layer to 20-30%. You can experiment with other blending modes, such as Overlay or Soft Light, to find a look that you like.
-
Step 9: Add Text (Optional)
You can use a text layer to add some text to the photo to make it look like a screenshot from a VHS video. Use the Text tools to add the time and date, the play and rewind icons, or the work ‘Play’ to simulate a VHS player.
If you find the text too sharp for the image, you can add the text to the original image with the Blur effect to make it appear more blurry, or place the text layer below the noise layer to create a more dusty effect on the letters.
-
Step 10: Final Touches
You can enhance the photo by adding an adjustment layer to adjust the hue/saturation, levels, or curves to customize the colors. Remember that another characteristic of older VHS tapes is the high saturation, so you can start tweaking the saturation of the overall image. You can also add a scanline effect using the Halftone filter in the Filter Gallery or a Vignette to simulate the low-quality and lines of a VCR.
How to Create the VHS Effect in Photoshop with Boris FX Optics
Boris FX Optics is a photo editing software and plug-in that works directly inside Adobe Photoshop and Lightroom. It offers a plethora of filters and tools to enhance your photography projects, including filters and visual effects from Boris FX's Continuum, Sapphire, and Particle Illusion plug-ins.
With Optics, you can create and edit presets of your favorite filters to use them quickly in future projects.
For this tutorial, you’ll use the plug-in version of Optics, but the steps are the same if you’re using the standalone photo editor.
-
Step 1: Download and Install Optics
Visit the Optics website and click 'Free Trial' to download the Boris FX Hub, where you can manage your product's downloads and updates. Install the Hub and launch it to sign in with your account. Find Optics and click download to install it on your computer.
If you’re having trouble installing Optics via the Boris FX Hub, you can download the Optics installer from the download page. Choose the right operating system and run the installer. Once installed, launch Photoshop and Optics should appear under your Filter menu.
-
Step 2: Create a Photoshop Document
Create a Photoshop document and import the image where you want to add the VHS effect. Right-click the layer to select 'Convert to Smart Object'. Then, duplicate the layer once and rename the duplicate 'Optics'.
-
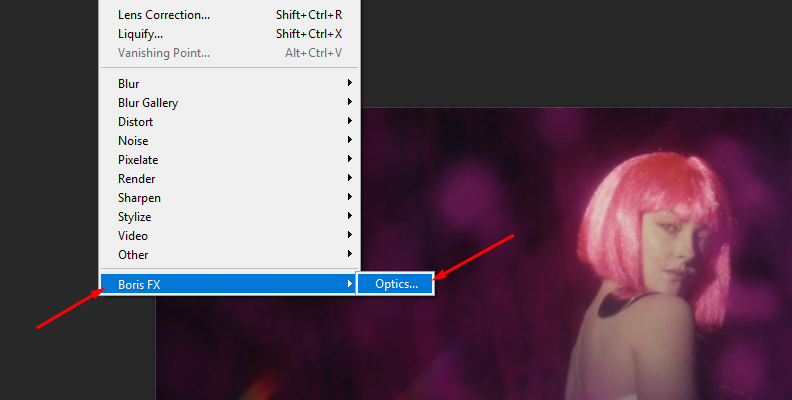
Step 3: Add Optics Filter
Select the ‘Optics’ layer and navigate to the Filter menu. Find Boris FX and then click Optics to apply the filter to the layer. As soon as you add it, the Optics interface will launch and automatically import the layer where you applied the filter, adding it to the layer panel in Optics.
The UI in Optics differs slightly from that in Photoshop. The layer panel is located on the left side, filters are positioned at the bottom center of the screen, and parameters are displayed on the right side. But don't worry if this is your first time using Optics, I'll guide you through each step.
-
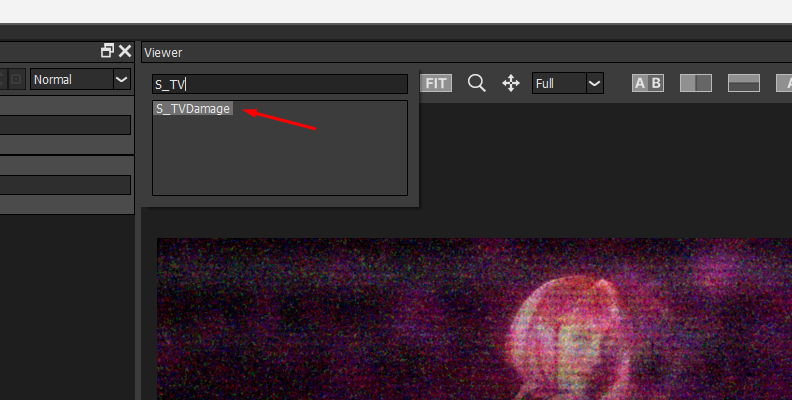
Step 4: Add S_TVDamage Filter
Select the top layer to begin adding filters in Optics. Just like in Photoshop, you can add more layers, add filters to each layer, and create mask layers.
We’ll use the S_TVDamage filter to simulate VCR and TV artifacts when playing a videotape, including static, color stripes, scanlines, and other settings to add fast-forward distortion, dropouts, and vignettes.
Browse the Stylize category or use the search function and type 'S_TVDamage', then click the filter to apply it to the selected layer.
-
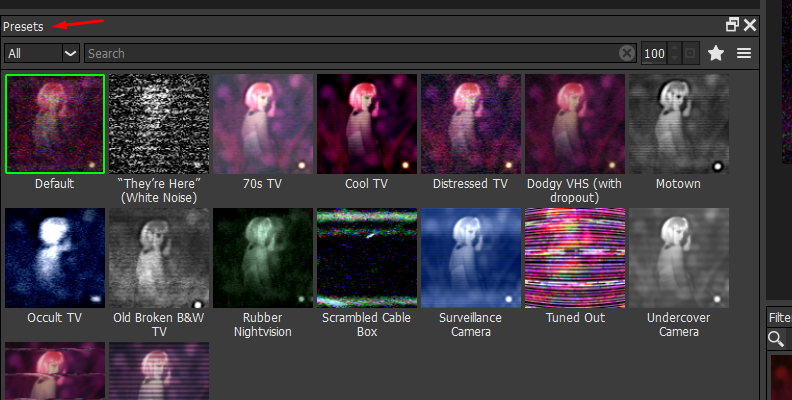
Step 5: S_TVDamage Presets
This comprehensive filter enables you to adjust it to create unique and distinct styles for your images. I suggest you take a look at the preset panel below the layers. There, you can find presets for classic VHS looks, including a 70s TV, horror film, black and white, fast forward, and other retro styles. You can use a preset and edit it as much as you want to.
-
Step 6: S_TVDamage Settings
Now, let’s look at the filter settings. There’s room for a lot of creativity, so I’ll outline the main parameters, and then you can experiment with them to craft your own version of a VHS look.
- First, select the TV Damage Mode to recreate a color or black-and-white VHS tape.
- To add distortion and VCR artifacts, increase the Reception Master and Interference Amp. The Horizontal and Vertical Hold settings can shift the image horizontally and vertically to simulate a weak signal.
- Increase the Tape Dropout Brightness to generate VCR dropouts in the photo. You can additionally add a vignetting effect by increasing the Vignette Darkness to darken the corners of the photo.
After adjusting the main settings, you can modify other groups for each specific parameter in the main section. You can fine-tune the scale and density of distortion and static noise, the ghosting effect, and adjust more details of the bars, the color stripes, the fast-forward effect, dropouts, vignettes, and add scanlines.
If you're working with color mode, you can increase the Saturation under Color Correct to give your photo that '90s VHS tape look.
To create a vintage appearance, increase the Fish Eye to simulate an old round TV screen. Also, experiment with the TV Pixel parameter to mimic a lower resolution for your photo.
Now, there's another trick with Optics. Some filters have a Time parameter you can adjust and preview in the viewer. If you change the values, you will see the effect advance in time, showing a different frame. This can help you better position the artifacts and VCR dropouts. If you don't see any changes when you modify the settings, try adjusting the 'Time’ to view a different frame.
Try out other combinations of settings and click Apply to save the changes and exit Optics.
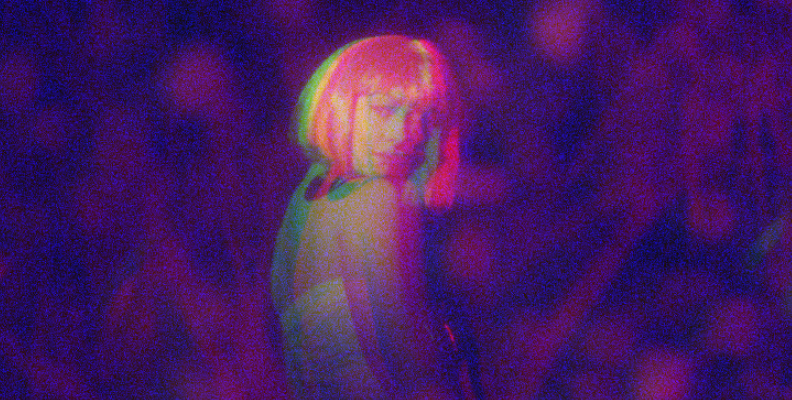
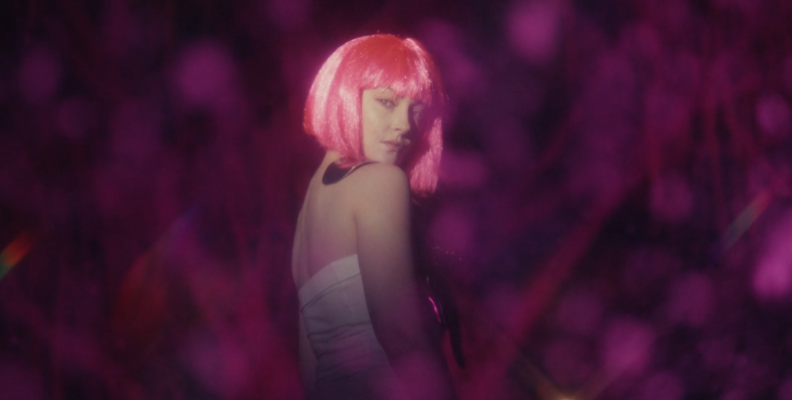
Before S_TVDamage
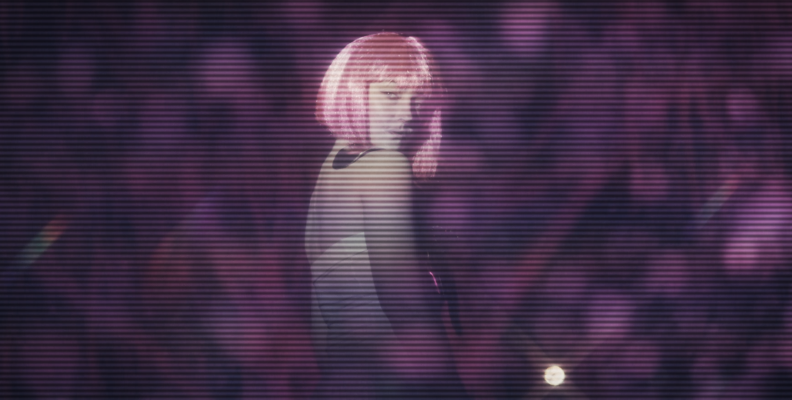
After S_TVDamage
Final Words
Optics and Adobe Photoshop provide the most accurate methods for creating a VHS effect in your images. You can get creative and add even more of the Optics filter, such as Digital Damage, Chromatic Aberration, and Film Damage. Start your free trial of Optics or purchase the affordable monthly subscription today!
FAQ
What are the Key Elements of a VHS Effect?
The following elements characterize a VHS effect:
-
Noise texture.
-
Color distortion.
-
Blurred image.
-
Scanlines.
-
Low-quality image.
-
Over-saturated colors.
-
Artifacts such as jitters and tracking errors.