


< Previous | Contents | Manuals Home | Boris FX | Next >
Getting Started with the Flame Exporter:
In SynthEyes, start the ‘Script/Flame/Integrate with Flame’ script to configure the integration with Autodesk Flame. (This will happen automatically the first time you export to Flame, if you haven’t done it already.) Note that this is a per-user install, no administrative privileges are required.
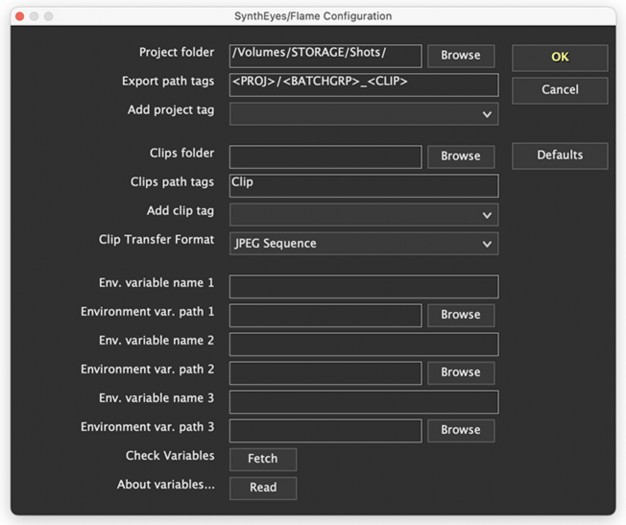
Project folder: Create or select a folder that will contain sub-folder for the files for each shot being tracked in SynthEyes and sent to Flame.
Set up the Export path tags that say where each shot being tracked will be located within the project folder. (More on the details in the next bullet item.) For example, with the default <PROJ>/<BATGRP>_<BATSML>_<CLIP> tags, a Flame project named Hyperbia with a batch group Shot27 and a clip name Driveby will export all the SynthEyes-created files (.action, .lensdistortion, meshes, etc) into the folder Shot27_ blah_Driveby within the Hyperbia folder within the main project folder, where blah is an random-looking identifier for the batch group. Any missing folders will automatically be created as needed: when you first export from the Flame Hyperbias project, it will create the Hyperbias folder as well as Shot27_ blah_Driveby folder. With a slash instead of underscore, ie <PROJ>/<BATGRP>_<BATSML>/<CLIP>, it will create the 3 folders as needed. We highly recommend including one of the batch-group identifiers: they are essential when in more complex situations with multiple batch
groups on a clip. If not, you run the risk of two different clips using the same filename and folder.
To create the tags, use the ‘Add project tag’ dropdown. Each time you select a tag in the dropdown, that tag will be appended to the tag list. You can edit the tag list further. Anything between tags is up to you; the default value shows both a slash (subfolder) and underscore between tags, and there’s no requirement that there be anything at all between tags. Available tags: Project name, project nickname (project name used if no nickname is available), clip name, reel name, batch group name, short or long batch group identifiers, and workspace name. (Need another type? Ask!)
Similarly, choose a Clips folder where you want the clips to be exported. The default is empty, no folder name at all, which means to use the clip’s folder, ie Hyperbia/Shot27_Driveby in the example above. But there’s more! The Clips path tag field can get more specific. The default “Clips” tags with no Clips folder translates to a Clips folder within the project folder, which is convenient for exporting both. However, you can send the Clips to a completely separate folder or drive, perhaps a RAID drive, by including a Clips folder followed by some detailed tags, perhaps the same as for the Project, or a different organization.
Choose the file type for sending clips to SynthEyes, currently JPEG, EXR, or ‘user.’ The user option is a flame preset that must be named “flame_user_preset.xml” and placed in SynthEyes’s File/User Data Folder.
Environment Variables: If your facility uses environment variables to point to media locations on different machines, you can set these up, otherwise leave these fields blank.
After hitting OK on the ‘Integrate with Flame’ panel, if Flame is already open, run Flame’s "Python/Rescan Python Hooks" menu item to let it know.
You can re-run this script to change the settings; you should only need to do that if you want to change the way your folders are organized, not for each project or client.
©2026 Boris FX, Inc. — UNOFFICIAL — Converted from original PDF.