Timeline
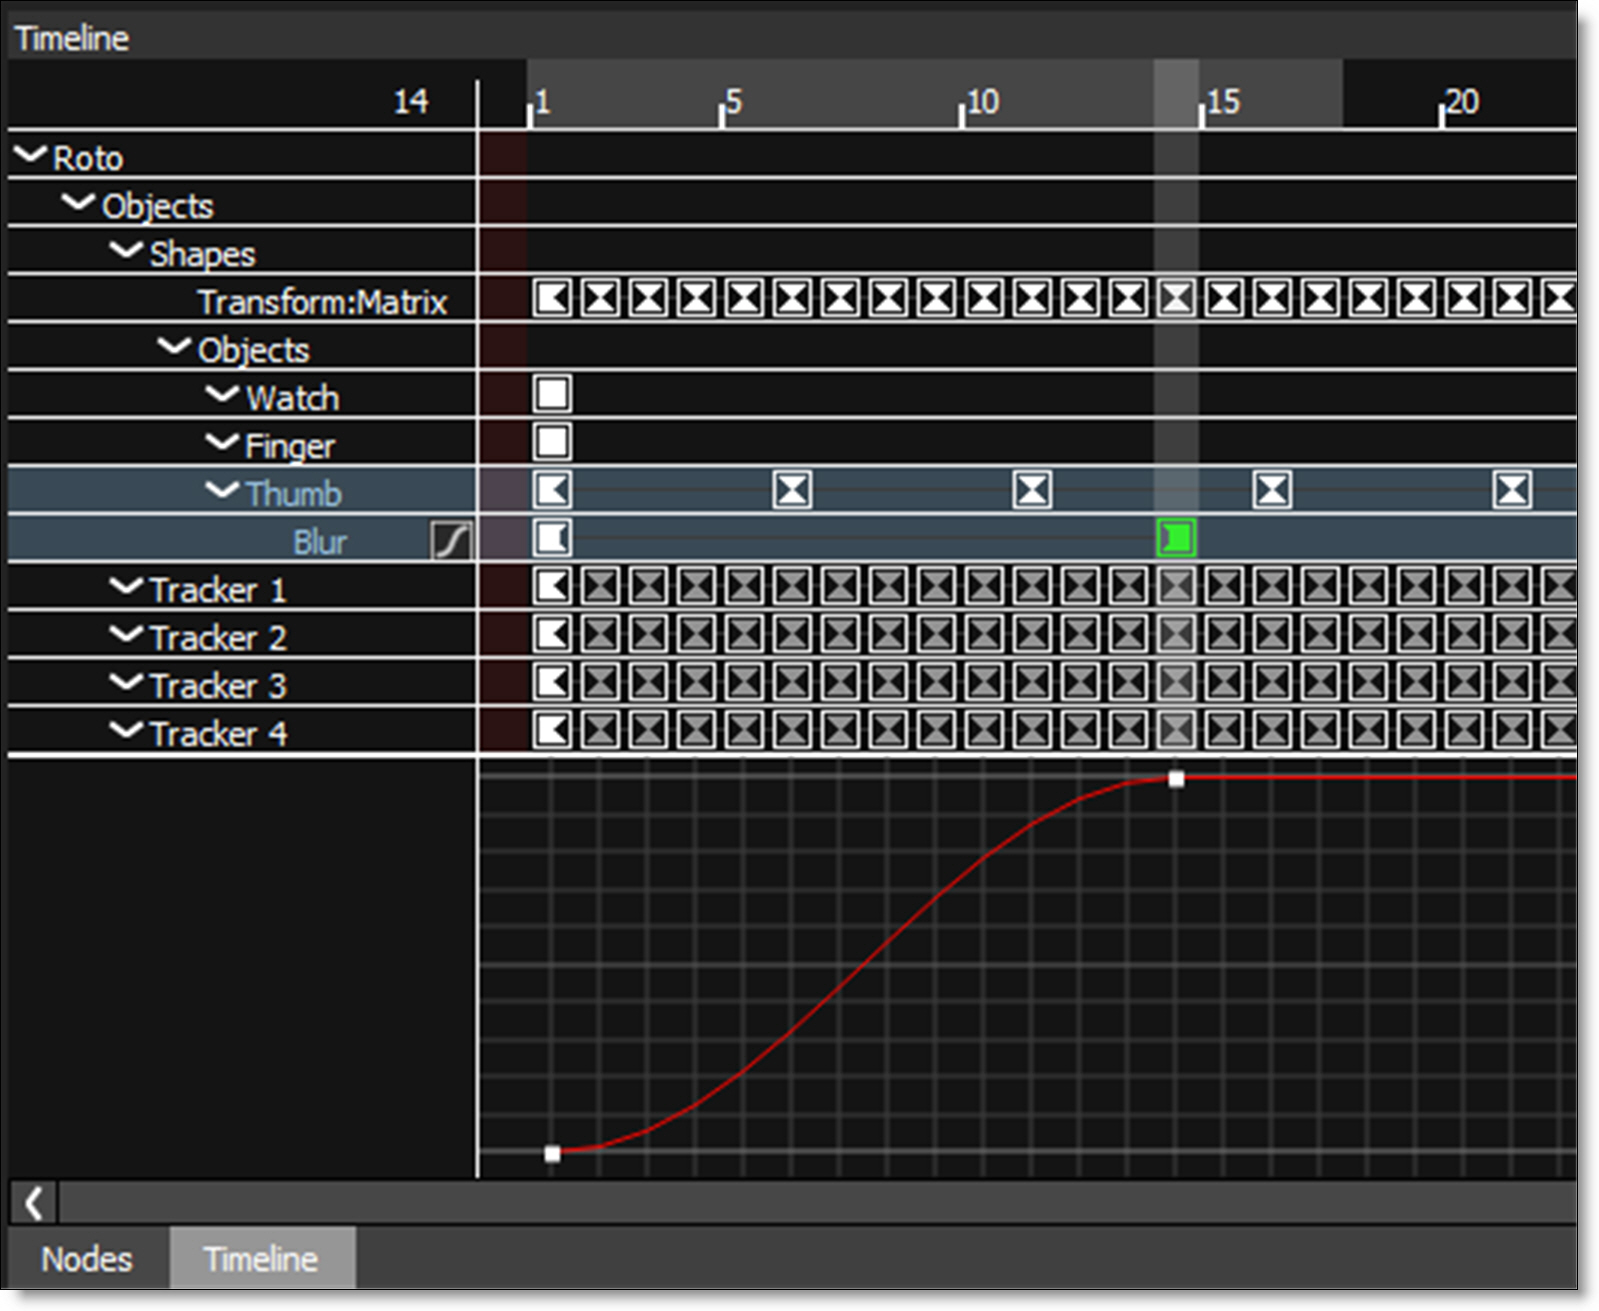
The Timeline is an overall view of all animated parameters. Animation is the process of setting values at various frames, or keyframes as they are called. These keyframes transition from one to another over time. The Timeline provides you with the tools necessary to view, edit, move or delete keyframes as well as change their interpolation type.

The Timeline is divided in three parts:
• Parameter List: lists all animateable parameters for a particular process.
• Timeline: displays keyframes over time.
• Curve Editor: The Curve Editor is a view mode in the Timeline that allows you to work with keyframe animations expressed as curves on a graph. The Curve Editor is only displayed once the Curve Editor icon is enabled.
Go to the Timeline tutorial to see how it works.
Parameter List
The Parameter list shows all objects in the current session. This list is arranged in a collection of shapes, filters, trackers and their associated parameters. Click the twirly to the left of the parameter to either show or hide parameters of a particular object.
Timeline
The Timeline is an overview of your objects and their keyframes. In the Timeline, you can edit a keyframe's position in time, but not its value.
Work Range
The Timeline displays the full session range with the work range displayed using a gray bar at the top of the Timeline.

The work range can quickly be adjusted by:
• Ctrl/Cmd-drag the ends of the work range bar to change the start and end.
• Ctrl/Cmd-drag the work range bar to slide it forward and back while maintaining the duration.
Current Time Indicator
The vertical line in the Timeline is the current time that you are parked at. To move the Current Time Indicator, just click and drag the shuttle slider below the Viewer or in the top line of the Timeline.

To center the timeline on the current frame, click the top left corner of the Timeline above the object labels.
Out of Bounds Indicator
The area before the first frame and after the last frame (the area between the actual session range and the work range, if extended) is shaded red in the timeline to show the usable, but out of bounds area.
Zooming and Panning the Timeline
The Timeline shows the duration specified for the current session. You can zoom in or out using the mouse scroll wheel to see the Timeline in more or less detail and can pan horizontally or vertically using the Spacebar while clicking and dragging.
Timeline Pop-up Menu
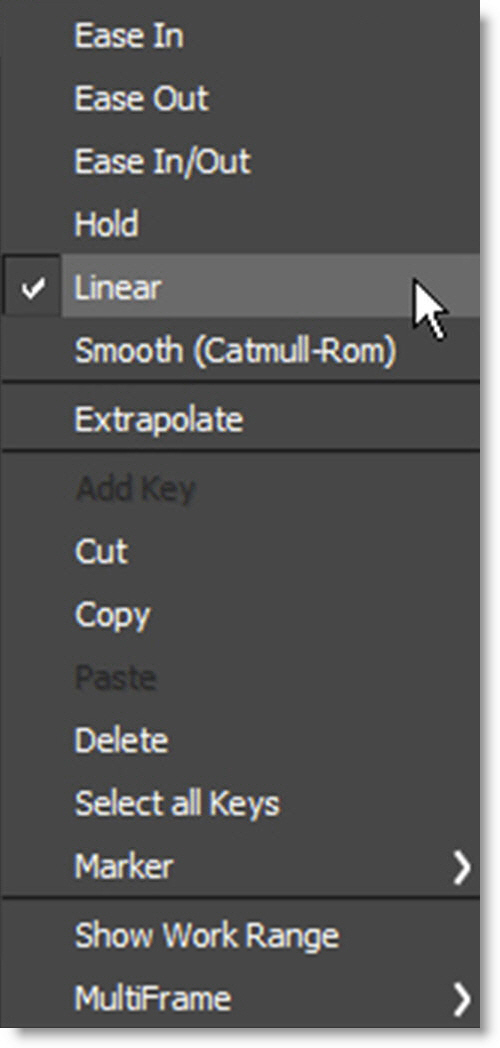
Right-click over a selected keyframe in the Timeline or point in the Curve Editor to open the Timeline pop-up menu.

Interpolation
Ease
Ease allows you to smoothly transition in or out of a keyframe.
• Ease In
Eases in to the selected keyframe.
• Ease Out
Eases out of the selected keyframe.
• Ease In/Out
Eases in and out of a selected keyframe.
Hold
There is no interpolation and abrupt switches in value occur at keyframes.
Linear
When values change, a straight line with sharp, abrupt angles from one keyframe to the next is drawn.
Smooth (Catmull-Rom)
Smooth (Catmull-Rom) creates a smooth animation curve between keyframes.
Extrapolate
Extends the path of the curve beyond the first or last points.
Note: When the Shape > Interpolation Engine preference is set to Spatial (Nuke-compatible), shape keyframes can only be set to Smooth (Catmull-Rom), Hold and Extrapolate. This ensures that shapes using Smooth (Catmull-Rom) interpolation in Silhouette exactly match the result in Nuke when exported.
Add Key
Right-click over the property you are interested in at the desired frame in the Timeline and select Add Key. Keyframes will be added to that property for all selected objects.
Note: You can also Alt-click in the Timeline to add a keyframe.
Cut
Deletes the currently selected keyframe or keyframes.
Copy
Copies the currently selected keyframe or keyframes.
Paste
Pastes the currently selected keyframe or keyframes.
Delete
Deletes the currently selected keyframe or keyframes.
Note: Individual shape points can be copied and pasted between keyframes using Ctrl/Cmd-Alt-C to copy and Ctrl/Cmd-Alt-V to paste.
Select All Keys
When hovering over a track, it will select all keyframes for that track. If not over a track (empty area), it will select all keyframes in the timeline.
Marker
Marker allows for the creation, editing or deletion of markers. Markers are a handy way of placing notes at specific points in time and are displayed as light blue squares at the top of the Timeline.

Hovering the cursor over the marker will display the marker’s text as a tool tip.
Create/Edit
A dialog box opens where you can enter, change, or clear text for the marker. When you enter text and click OK, a marker is displayed.
Delete
Deletes the marker at the current frame.
Delete All
Deletes all markers.
Show Work Range
When enabled, the Timeline displays only the start and end frames of the Work Range.
MultiFrame
Reset To Work Area
Resets all MultiFrame parameters.
Reset Fade Range
Resets the Fade In and Fade Out ranges.
Center On Current Frame
Centers the MultiFrame range on the current frame.
Moving One Keyframe in Time
A single keyframe can be moved by selecting it and then dragging it to a new location.
Moving a Selection of Keyframes in Time
Multiple keyframes can be moved by first selecting a range using the Shift key and then dragging on them to a new location.
Selecting Objects
Objects can be selected within the Timeline. Clicking the name of an object selects it. Multiple objects can be selected by Shift-clicking on them. Ctrl/Cmd-clicking an object after it is selected will deselect it.
Curve Editor
The Curve Editor is a view mode in the Timeline that allows you to work with keyframe animations expressed as curves on a graph. It allows you to visualize the interpolation of the animation.

The Curve Editor is only displayed once the Curve Editor icon, located to the right of the parameter in the Timeline, is enabled.
Timeline Keyboard Shortcuts
Shortcut | Action |
|---|---|
Scroll wheel | Zooms the Timeline in and out |
Shift-Middle-mouse drag | Zooms the Timeline in and out |
Space Bar-move mouse | Pans the Timeline |
Middle-mouse drag | Pans the Timeline |
Single-click keyframe | Selects one keyframe |
Ctrl/Cmd-click keyframe | Toggle the keyframe selection |
Shift-click keyframes | Selects a range of keyframes |
Alt-click | Inserts a keyframe |
Right-click keyframe | Opens Timeline pop-up menu |
Click-drag keyframe | Moves the keyframe |
Ctrl/Cmd-drag the ends of work range bar | Changes the start and end of the work range |
Ctrl/Cmd-drag the work range bar | Slides the work range forward and back |
Click top left corner of the Timeline | Centers the timeline on the current frame |
Curve Editor Keyboard Shortcuts
Shortcut | Action |
|---|---|
Alt-click on curve | Inserts a point on the curve |
Click-drag curve point | Moves the curve point |
+ or = | Zooms the Curve Editor in |
- | Zooms the Curve Editor out |
Space Bar-move mouse | Pans the Curve Editor |
Hover cursor over curve | Displays the current curve value |
Right-click curve point | Opens Curve pop-up menu |