


Part of the Options Palette, the Keyframe Palette is used to set the default behavior of keyframes in a project.
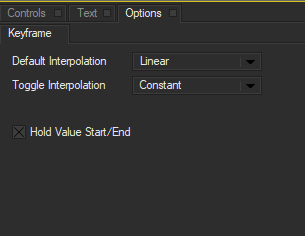
The Default Interpolation menu sets the default interpolation type assigned when you adjust any parameter at a keyframe. Manual changes to interpolation type are still available for the individual parameters. Since interpolation determines how Title Studio creates intermediate values between two keyframes, you can use this option to set the initial interpolation type. For example, when you create an animated transition between two shapes, you might want to set the Default Interpolation menu to Ease In/Out to create natural movement between keyframes. On the other hand, when working with a Shader where you want most of your parameter adjustments to affect the image globally, you might set the Default Interpolation menu to Constant. As mentioned before, you can always use another interpolation type by selecting it manually from the parameter’s interpolation field.
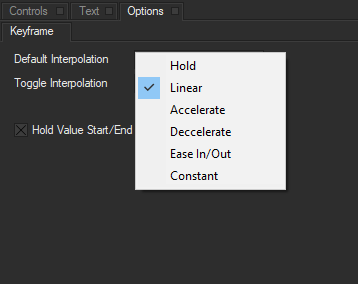
Available Interpolations are:
- Hold keeps the parameter value constant from the current keyframe to the next keyframe in that parameter’s track.
- Linear values for a parameter change in equal increments from the current keyframe to the next keyframe with that parameter activated.
- Accelerate values for a parameter change slowly at first and change more quickly as they approach the next keyframe.
- Deccelerate values for a parameter change quickly at first and change more slowly as they approach the next keyframe.
- Ease In/Out creates smooth, natural motion paths by applying bézier interpolation near each keyframe.
- Constant applies the parameter change globally without creating keyframes.
The Toggle Interpolation menu lets you set an alternative interpolation type. You can toggle from the default interpolation to the toggle interpolation by Alt-clicking a parameter’s interpolation field. This allows you to quickly access another frequently used interpolation type in addition to the default setting.
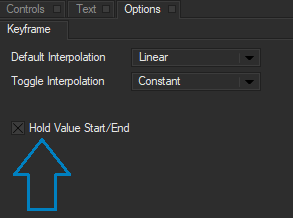
The Hold Value Start/End checkbox determines the behavior of the initial and final keyframes. When checked, there will be no interpolation between the first and last keyframe. Changes made to the first keyframe will carry over to the final keyframe. This allows you to set up your effect without having it auto animate. To enable auto-animation, disable the checkbox. This will allow for interpolation between the first and last keyframe, meaning changes made to the first keyframe will use Default Interpolation between the first and last keyframe.
Return to Main Title Studio Page