Light flickering in videos can be a frustrating issue, whether caused by artificial lighting, shutter speed mismatches, or frame rate inconsistencies. It disrupts the viewing experience and can undermine the professional quality of your footage.
Thankfully, popular video editing programs like Adobe Premiere Pro offer powerful tools and techniques to address and eliminate any flickering found within your videos.
This guide walks you through the whole process of removing flicker in Premiere Pro in multiple ways and provides practical tips to avoid it entirely in all your future projects.
Without further ado, here's what you need to know.
What is Light Flicker?

Light flicker is that attention-grabbing and distracting, rapid fluctuation in brightness you might notice in some video clips, especially if filmed under artificial lighting. It’s caused by the way certain lights, like fluorescent or LED bulbs, emit light in pulses rather than a steady beam. While our eyes might not always catch these changes, cameras are much more sensitive to them.
The problem often arises when your camera’s frame rate or shutter speed doesn’t sync with the light’s flicker frequency. Think of it like trying to watch a spinning fan through a window shutter—it creates a strobe effect that’s distracting and visually unappealing.
Flicker can appear as subtle as faint waves or as disruptive as a full-blown strobe, depending on the setup. It’s most common in indoor settings with cheap or mismatched light sources, but even outdoor shoots can experience flicker from mixed lighting conditions or electrical interference.
Understanding light flicker is key to eliminating it. Once you know what’s causing it, you can take steps to fix or avoid it altogether.
Remove Flicker in Premiere Pro

Light flicker in videos, often caused by inconsistent lighting or mismatched camera settings, can be distracting. Adobe Premiere Pro provides several built-in tools to address this issue effectively.
Adjust Brightness Using Lumetri Color
The Lumetri Color panel is a powerful tool for correcting flicker caused by fluctuating brightness. Open your video in the Premiere Pro timeline and navigate to the Lumetri Color panel. Adjust the Shadows and Highlights sliders to balance sudden changes in brightness, smoothing out the flicker. Careful tweaks can make a significant difference without affecting overall video quality.
Apply Temporal Smoothing with Gaussian Blur
Temporal smoothing involves blending adjacent frames to minimize flicker. Apply the Gaussian Blur effect from the Effects panel to your video clip. In the Effect Controls panel, set the blurriness to a low value, such as 2-3, and enable the Repeat Edge Pixels option to maintain the video edges. Activating temporal smoothing will blend frames subtly, reducing the flicker effect while preserving sharpness.
Use Frame Blending
Frame blending can be useful for addressing flicker caused by mismatched frame rates. This process merges frames, creating smoother transitions and reducing the appearance of flicker in the footage.
To apply frame blending, right-click on the clip in your timeline, go to Time Interpolation, and select Frame Blending. This option instructs Premiere Pro to interpolate frames by combining visual data from adjacent frames, effectively reducing visible flicker or jitter.
Unlike other time interpolation methods, such as Frame Sampling (which duplicates frames) or Optical Flow (which creates entirely new frames), Frame Blending works by averaging frames, making it a quicker and less resource-intensive solution.
This technique works best for footage with subtle flicker or when the issue arises from differences in lighting frequencies or shutter speeds. It’s important to note, however, that while Frame Blending is useful for smoothing out flicker, it might introduce slight blurring in fast-moving subjects. Therefore, it’s recommended to review the video playback after applying this method and adjust other settings, like brightness or contrast, if necessary.
Test and Refine
After applying these adjustments, play back the video to evaluate the results. If the flicker persists, revisit the Lumetri Color or Effect Controls panel and fine-tune the settings. Small adjustments can go a long way in achieving a flicker-free video.
You can also use the built-in Premiere Pro anti-flicker filter that helps with sharp edges flickering and thin lines. Click on your video and navigate to the "Effect Controls" panel. Once there, expand the motion controls group and find the anti-flicker filter parameter. Increase its strength and preview the results one frame at a time if needed.
It's trial and error to remove light flicker from your video entirely, but with the right combination of settings, you can make it happen.
Remove Flicker in Premiere Pro with BCC Flicker Fixer
Premiere Pro is a versatile video editor offering various tools for different tasks. However, when it comes to addressing specific issues, creating transitions, effects, keyframing, etc., it's always a lot more time to take the manual approach using the built-in Premiere tools.
The same applies to removing or fixing flicker.
This is why, in most cases, we recommend using tools that are specifically meant to address the issue, such as the BCC Flicker Fixer found in the Continuum creator pack by Boris FX.
Continuum is a product available for all popular video editing programs, meaning you can use it in your preferred software without having to change your working environment and spend time learning a different interface.
The hundreds of effects, tools, transitions, presets, and filters found in this pack are very easy to apply to both videos and images and even easier to modify.
You can download and install a free trial version of Continuum for your preferred video editing software choice and try the BCC Flicker Fixer effect (and all other tools).
Here's what you'll need to do after installing Continuum:
Step 1: Launch Premiere and Import Media
The first step is to launch Premiere Pro, create a new project, and import the video footage in which you see flicker.

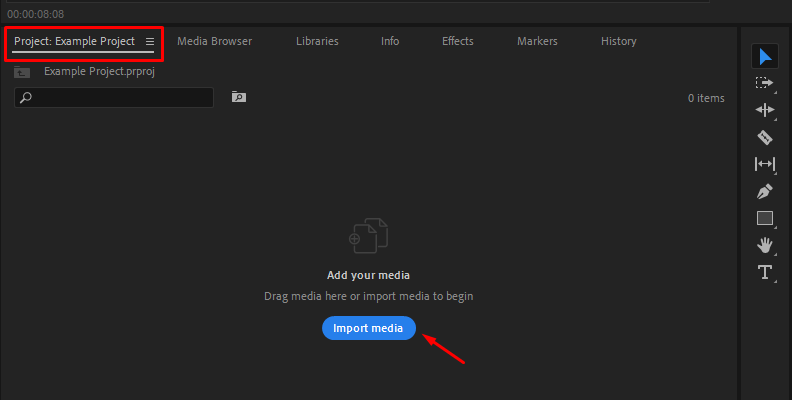
Step 2: Create a Sequence/Timeline
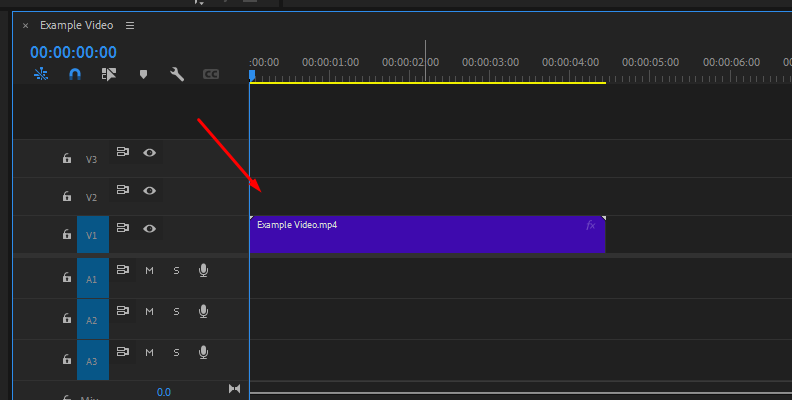
Once you've imported your video clip(s), you need to create a sequence/timeline. For this, simply drag the video from the "Project" tab onto the timeline area. This will automatically place it on a video track, and it is now ready for our flicker removal task.
Step 3: Find and Apply the Effect
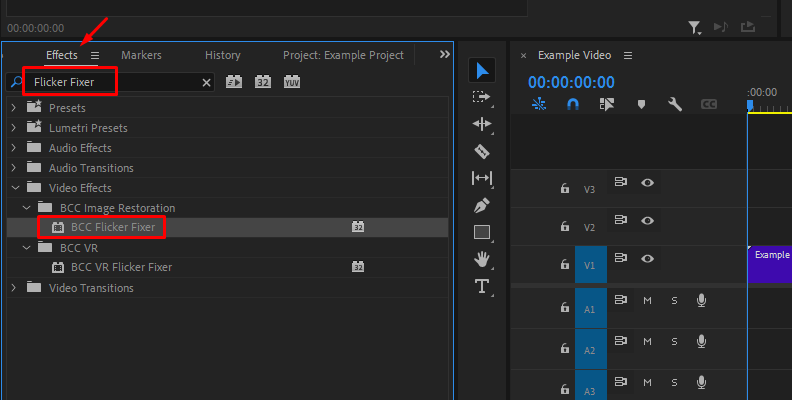
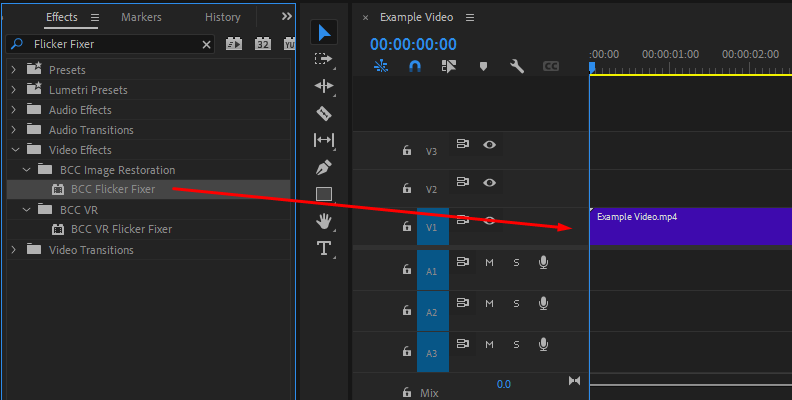
To find and apply the effect, access the "Effects" tab as shown in the image below. Then, use the search bar to find BCC Flicker Fixer and drag and drop it to your video.
Step 4: Adjust Settings if Required
Now that the effect is applied to your video, you should access the "Effect Controls" panel and make any changes/modifications based on your project's needs.
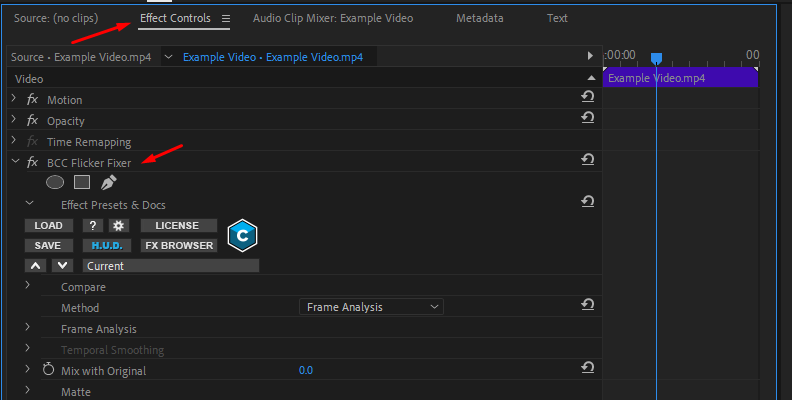
Almost all Continuum effects and tools have multiple available presets you can apply with just a click of a button. Within the effect controls panel, click the "FX Browser" button, as shown in the image below, to get access to all presets.
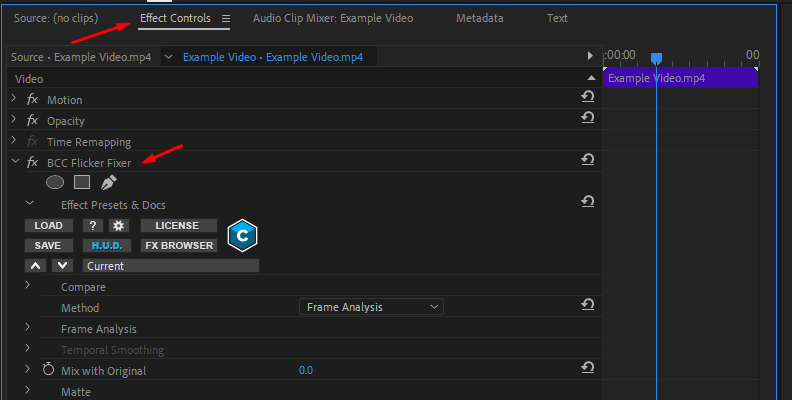
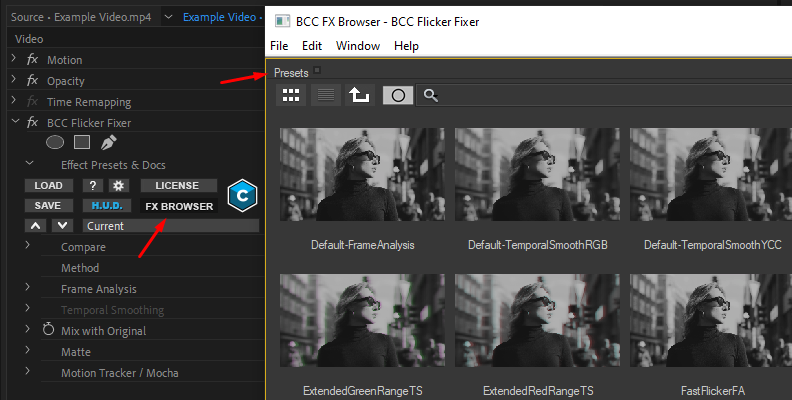
Refer to the BCC Flicker Fixer info page for more information on what each setting does, and keep adjusting based on whether you're seeing less or more flicker in your video(s).
How to Avoid Flickering in Videos
Preventing flicker during video production requires a combination of proper planning, suitable equipment, and optimized settings. By addressing potential causes of flicker at the source, you can save significant time in post-production.
Use Proper Lighting
The quality and type of lighting play a crucial role in preventing flicker. Invest in high-quality, flicker-free LED lights specifically designed for video production. These lights operate at a consistent frequency, minimizing flicker. Additionally, avoid mixing light sources with different frequencies, such as natural light and artificial light, as this can cause inconsistencies in brightness.
Match Shutter Speed to Lighting Frequency
Ensure your camera’s shutter speed aligns with the frequency of the power supply in your region. For areas with a 50Hz power supply, use shutter speeds of 1/50 or 1/100. In regions with 60Hz power, set the shutter speed to 1/60 or 1/120. Proper synchronization prevents the pulsating effect that often results in flicker.
Adjust Frame Rates
Set your camera’s frame rate to match the intended playback frame rate. Mismatched frame rates can cause uneven brightness transitions, especially when combined with artificial lighting. Testing different frame rates in your filming environment can help you find the optimal setting.
Use Neutral Density (ND) Filters
When filming in bright environments, use ND filters to control exposure rather than increasing the shutter speed. Higher shutter speeds can inadvertently cause flicker when filming under artificial light. ND filters allow you to maintain optimal shutter speeds while controlling the amount of light entering the camera.
You can also look further into getting an anti-flicker filter for the same purpose.
Stabilize Your Power Source
Unstable power sources can cause fluctuations in the frequency or intensity of artificial lighting, leading to flicker. Use power stabilizers, uninterrupted power supplies (UPS), or generators to ensure a consistent power supply during video production.
Test and Calibrate Equipment
Before shooting, perform test recordings in the environment to identify any flicker issues. Review the footage and make necessary adjustments to your camera settings, lighting, or power sources. Calibrating your equipment based on these tests can help avoid problems during filming.
Optimize Camera Settings for Slow Motion
If you plan to shoot slow-motion footage, be cautious with lighting and shutter speeds. Flicker is more noticeable at high frame rates, as the increased frame capture rate exaggerates lighting inconsistencies. Use high-frequency, flicker-free lights and test your slow-motion settings thoroughly.
By following these methods, you can significantly reduce or eliminate flicker during filming, ensuring a smoother production process and high-quality results.
Final Words
Whether you're making time-lapse videos, slow-motion footage, or any other type of content, experiencing flickering of any type can be frustrating. Knowing which type of flickering you're seeing is the first step to addressing the issue and preventing it from happening in the future.
Hopefully, what you learned in this guide will help you improve all your future work. We thank you for reading and wish you the best of luck!
FAQ
This section contains the most frequently asked questions on this topic. Besides the information in the guide above, here you can find quick answers to popular questions regarding dealing with flickering in Premiere Pro.
Q: Should you keep anti-flicker on or off in Premiere?
A: The anti-flicker filter in Premiere Pro is included by default, but its strength is set to 0. If you are experiencing flickering issues with your videos, you can try increasing the filter strength to different values to see if you notice any improvement.


